Every plant has the same goal during a color change: clear the old color quickly, avoid streaks, and get the next run stable without wasting resin or time. Yet in real production, two machines running the same resin can behave completely differently.
One cleans out in a handful of shots, while the other keeps ghosting color long after the purge should have worked.
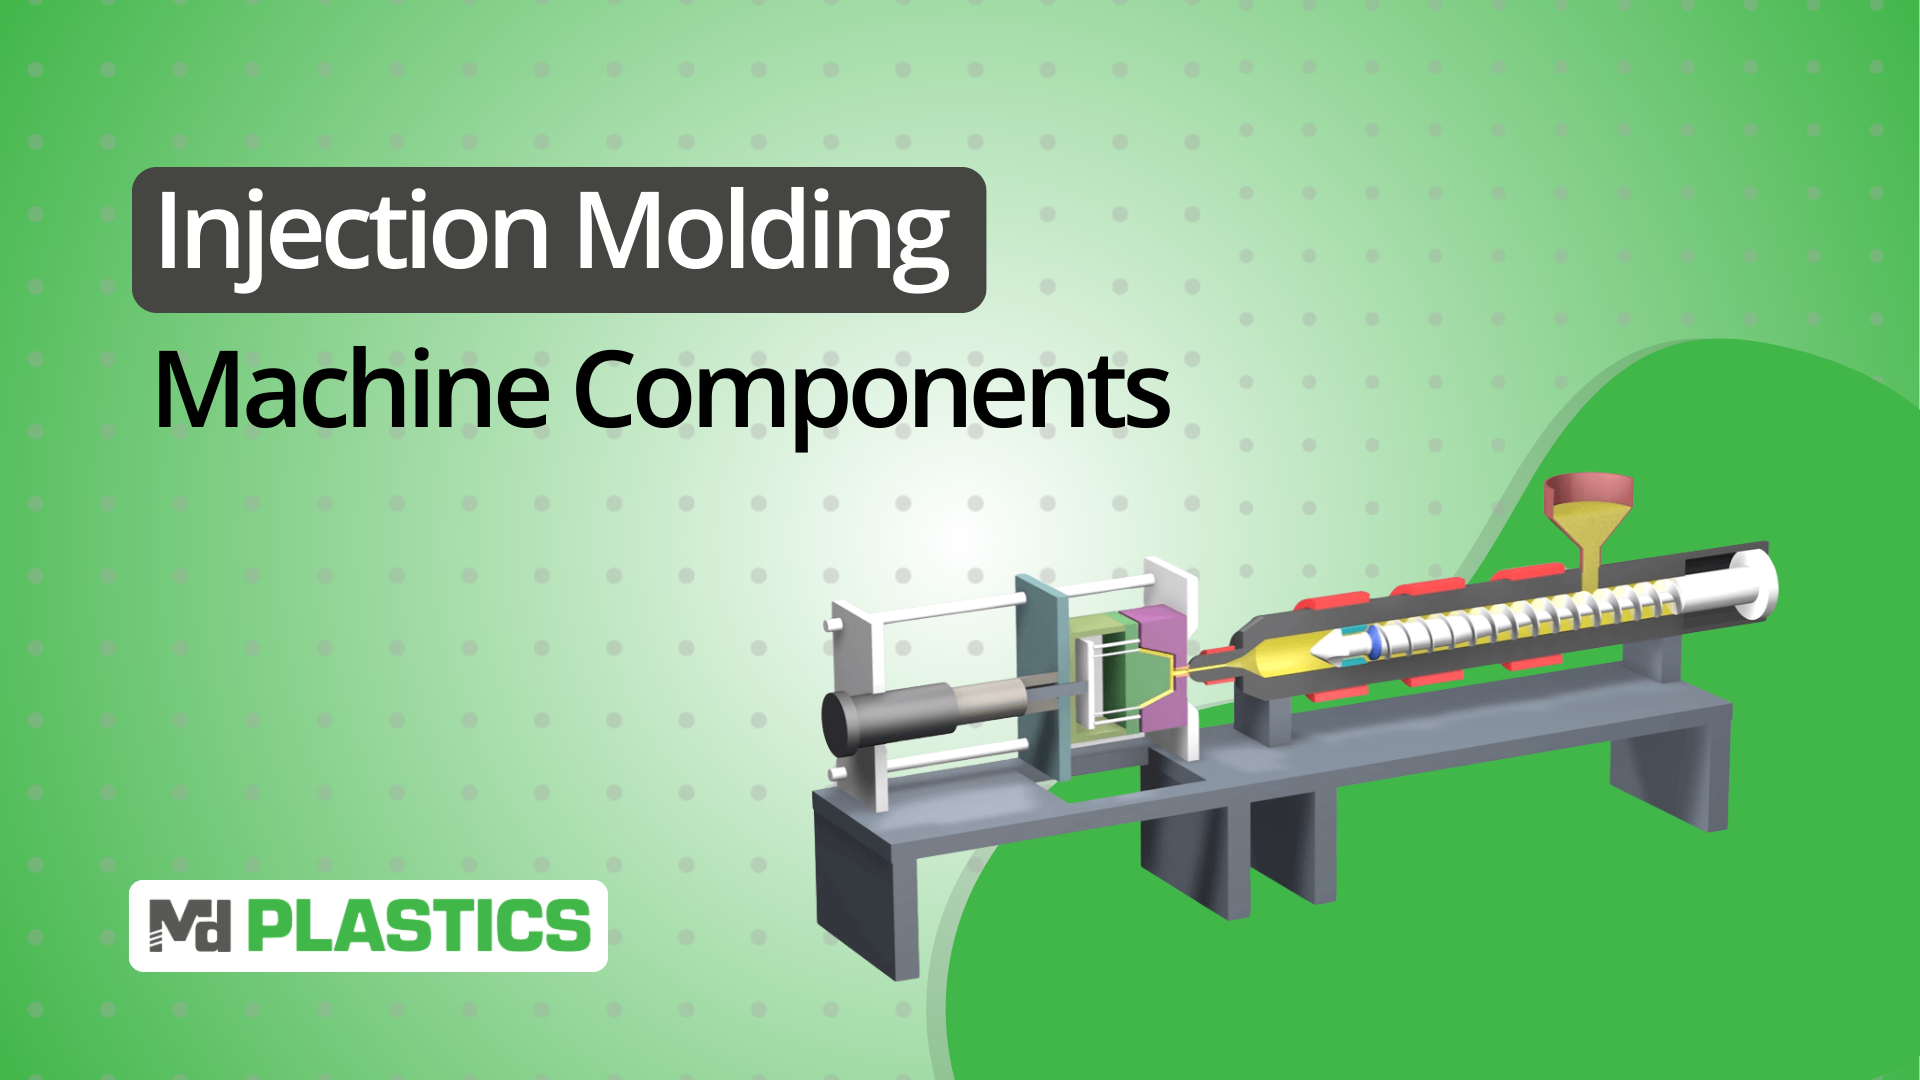
That inconsistency isn’t random. It comes from what’s happening inside the screw, barrel, check valve, and hot-runner flow paths, places where pigment can anchor, smear, or recirculate if the purge isn’t driven correctly.
Quick color change isn’t about “using more purge,” and it isn’t solved by a single temperature adjustment. It’s a coordinated sequence of melt displacement, shear control, pressure loading, and proper material selection.
When those factors line up, the old color exits cleanly; when they don’t, the next resin inherits every mistake hiding upstream.
This guide distills the process into clear steps: which purge approach to use, how to set up the machine for fast transitions, what actually clears pigment hang-up, and how to troubleshoot color that refuses to leave the system.
Key Takeaways
Quick color change failures usually come from melt-path issues, dead spots, NRV leakage, low shear, or temperature imbalance, not the colorant itself.
An effective purge relies on shear + pressure, using high backpressure, high RPM, and short-shot cycles to scrub pigment from the screw, barrel, and nozzle.
A 30-second pre-purge setup check (temps, backpressure, NRV sealing, hot-runner balance) cuts most purge times in half.
Hot runners demand a different strategy: steady flow, controlled temps, and valve-gate cycling to clear trapped color.
MD Plastics improves quick color change performance at the source with engineered screws, NRVs, optimized barrels/nozzles, and real melt-monitoring tools that prevent color hang-up before it starts.
Why Quick Color Change Fails
Most slow or incomplete color transitions aren’t caused by what’s happening inside the plasticating system. These are the underlying mechanisms that actually make color hang up:
Dead spots in the screw or barrel: pigment lodges in low-shear regions (flight roots, transition zones, worn sections).
NRV leakage or slow sealing: backflow blends contaminated melt into the new resin, creating repeat streaks.
Temperature profile mismatch: too hot → pigment smears; too cold → unmelt carries color into the next shot.
Low backpressure or low RPM: insufficient shear prevents pigment from breaking loose from metal surfaces.
Hot runner geometry traps color: corners, pockets, and long residence paths retain previous pigment even when the barrel is clean.
Quick color change succeeds when flow, shear, pressure, and temperature conditions force pigment out of hiding, not when purge is simply pushed through the machine.
Quick Color Change Procedure
A successful color change depends far more on how you drive the purge than on which purge you use.
The sequence below forces pigment out of the screw, barrel, NRV, and front end by combining displacement, shear, and pressure, exactly what’s required for a fast, clean transition.
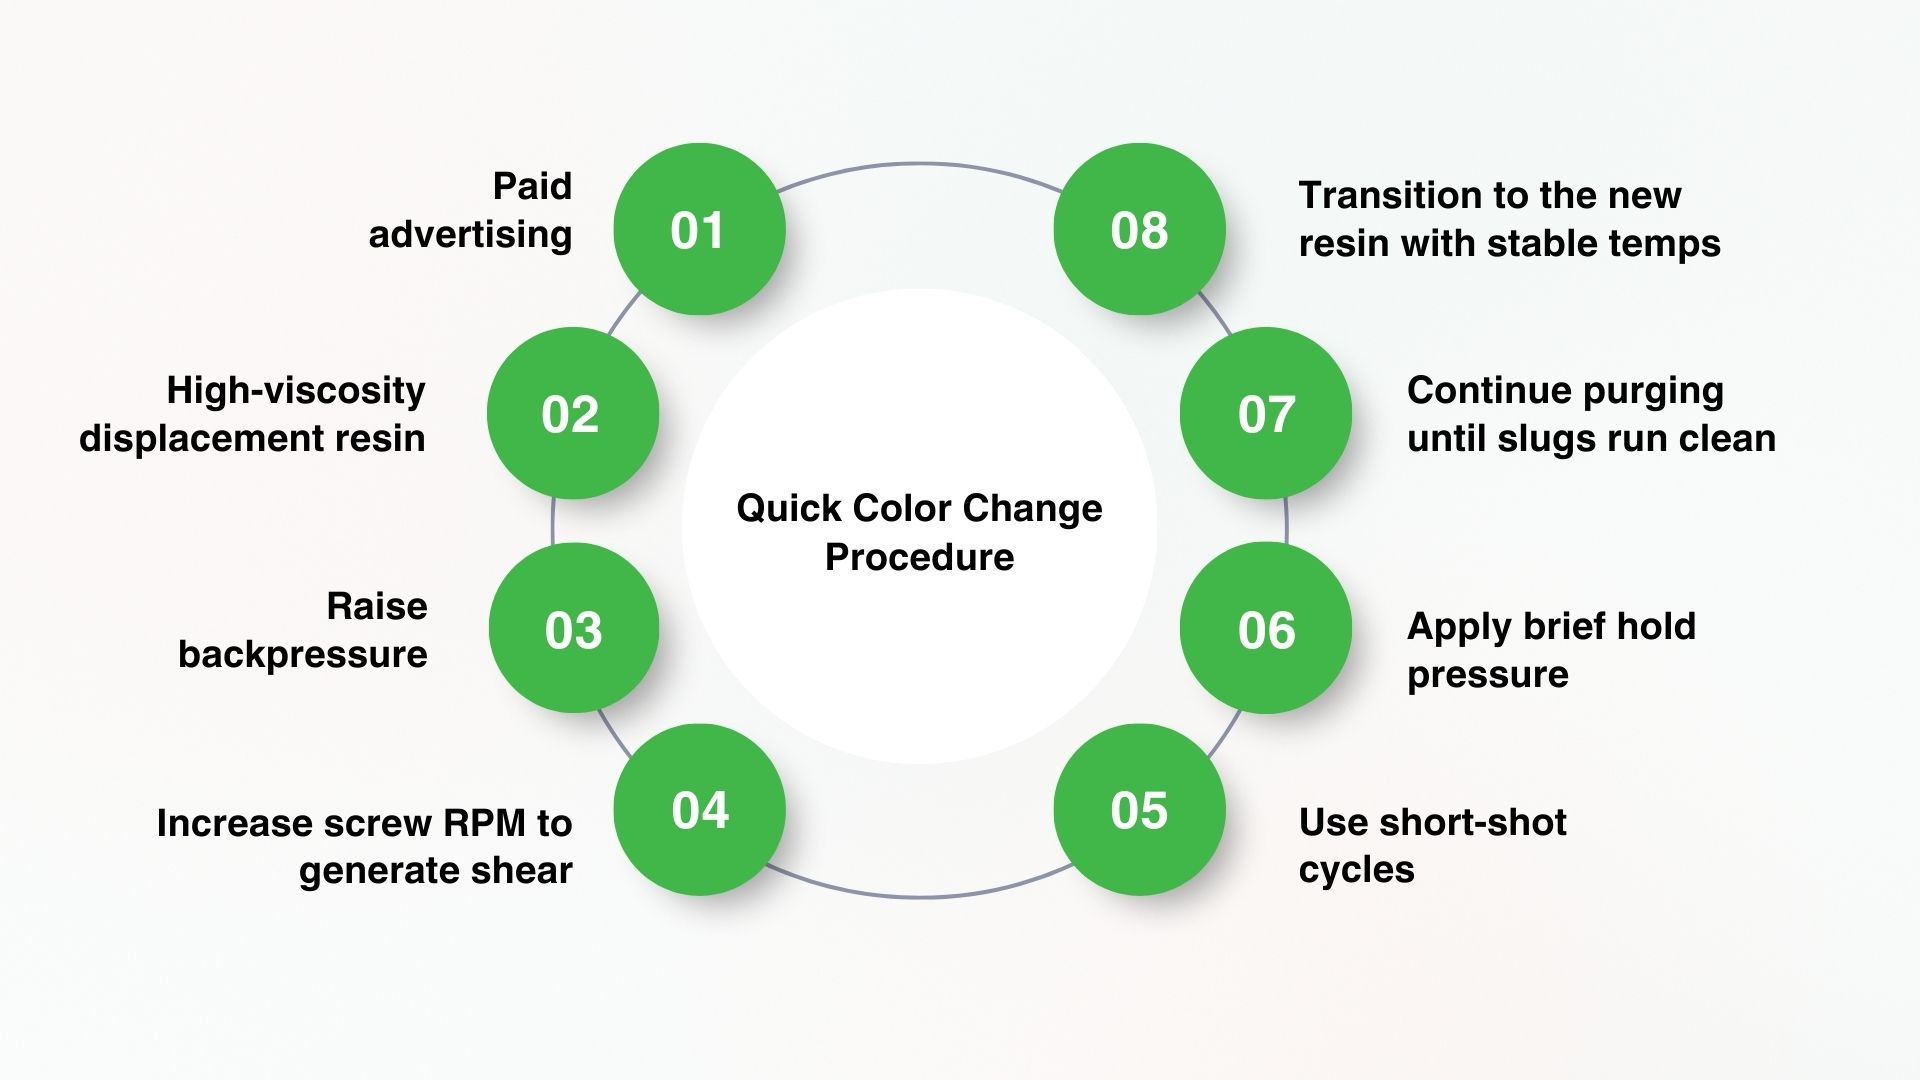
1. Empty the barrel / run down the previous resin
Reduce shot size until the machine begins to short, ensuring minimal contaminated melt remains.
2. Load purge or a high-viscosity displacement resin
Introduce the purge while maintaining continuous screw rotation for immediate contact with screw flights.
3. Raise backpressure (typically 100–200 psi)
This compresses the purge, forcing it into low-flow areas where pigment usually hides.
4. Increase screw RPM to generate shear
Higher RPM improves scrubbing, loosening pigment from flights, barrel walls, and the NRV.
5. Use short-shot cycles
Short injections prevent dilution, and repeatedly scrub the screw and check valve for faster color removal.
6. Apply brief hold pressure
Hold for 1–2 seconds each cycle to pack purge into dead spots behind the NRV and at the front zone.
7. Continue purging until slugs run clean
Look for consistent color, no streaking, and no ghost tint if variation remains, contamination still exists.
8. Transition to the new resin with stable temps
Introduce the next color/material and adjust the temperature profile gradually to avoid smearing or unmelt.
When these steps are followed in sequence, the purge does the work it’s designed to do: high shear loosens pigment, pressure packs it out of hiding, and controlled thermal conditions prevent smear, turning color changeovers from unpredictable events into a repeatable, low-waste process.
BEFORE You Purge: A 30-Second Checklist
A fast color change can happen only if the machine is ready for the purge to work.
These six checks prevent the mechanical, thermal, and flow-related conditions that normally trap pigment and extend purge times.
1. Hopper Completely Drained & Throat Cleared
Why it matters: Even a handful of old pellets will re-tint the purge stream and create “ghost color” several cycles later.
Failure looks like: Color keeps reappearing after you think the purge is clean.
2. Barrel Temperatures Matched to the Purge Resin’s Processing Window
Why it matters: Mechanical purging relies on shear + controlled melt viscosity. Wrong barrel temps neutralize both.
Too cold → purge won’t generate shear → pigment stays seated in flight roots.
Too hot → purge becomes too fluid → it slides over contamination instead of dislodging it.
3. Backpressure & Screw RPM Increased Before Purging Begins
Why it matters: Shear cleaning requires compression. If backpressure or RPM is too low, the purge behaves like ordinary resin and fails to scrub.
Pro tip: Backpressure should be high enough to raise screw torque, not just displace melt.
4. Hot Runner Temperatures Balanced to Avoid Dead Zones
Why it matters: Color hides in the coolest areas of a manifold. A 10–20°F imbalance is enough to trap pigment and release it later as streaks.
Failure looks like: Molded parts go clear → streak returns mid-run → operators think the “purge didn’t work,” when the real issue is uneven manifold heat.
5. NRV (Check Valve) Verified for Proper Sealing
Why it matters: A leaking NRV mixes contaminated melt backward into the screw channel, instantly doubling purge time.
Tip: If backpressure rises unpredictably or the screw recovers inconsistently, the NRV is already compromising the color change.
6. Purge Material Chosen for Viscosity + Thermal Compatibility
Why it matters: Purge must be more viscous than the outgoing resin to scrub, but still melt properly under current temps.
Viscosity mismatch causes:
Smearing
Thin, ineffective purge flow
Incomplete pigment displacement
A 20–30 second setup prevents 80% of slow color changes by ensuring that the purge material can actually reach the dead spots, generate the right shear, and push color out cleanly.
Skip these steps, and even the best purge compound turns into an expensive flushing resin.
Hot Runner vs. Cold Runner: How the Purge Changes
Color change behaves very differently depending on the runner system. These are the operational differences that actually determine purge time and purge success.
Cold Runner Systems
Why do they purge faster? Cold runners have fewer retention zones and simpler melt paths, so pigment clears more predictably.
Key practices:
Purge through the sprue and parts, not just the nozzle—this prevents freeze-off from trapping old color.
Maintain fast cycling so the runner stays molten during the purge.
Use short shots once a clean flow is visible to fully clear the screw and barrel.
Common failure mode: Allowing the sprue or runner to cool just slightly—this traps color and forces operators to restart the entire purge cycle.
Hot Runner Systems
Why they purge slower: Hot runners contain multiple retention zones, manifold bends, drops, nozzles, valve stems, each capable of holding pigment long after the screw and barrel are clean.
Key practices:
Purge at a steady, continuous flow, not in long pauses or hesitations. Manifolds need constant velocity to sweep out trapped pigment.
Identify “temperature traps,” areas where cooler steel slows flow and protects old color. Balance nozzle temps before beginning the purge.
Cycle valve gates open and closed during purging to clear material behind the stems and in the seat pockets.
Avoid aggressive cooling of the mold during purge—cold steel increases pigment retention.
Common failure mode:
Parts begin to look clean → then color streaks appear again 10–20 shots later. This almost always means the manifold, not the screw is holding color.
Quick color change success depends far more on runner design than purge material.
Understanding how each system holds and releases pigment turns a trial-and-error purge into a predictable, controlled process.
Troubleshooting Quick-Color-Change Problems
When a color change drags or defects appear after purging, the symptoms almost always point back to a specific mechanical or melt-behavior issue.
This table shows how to identify the root cause in seconds.
Defect | Likely Root Cause | Fast, Effective Fix |
|---|---|---|
Streaking/ghosting | Pigment trapped in low-shear areas (metering zone, root of screw flights) | Increase RPM + backpressure; run short-shot shear cycles to scrub flights |
Color swirls / haze bands | Poor purge displacement; flow never fully displaces old resin | Switch to higher-viscosity purge; increase hold pressure to force purge into dead spots |
Black specs | Degraded resin in barrel, NRV pockets, or nozzle | Raise front-zone temp 5–10°C; increase backpressure; run mechanical shear purge |
Color keeps returning after looking clean | NRV leakage mixing contaminated melt back into the screw; screw/barrel wear | Inspect/replace NRV; verify compression ratio; increase backpressure temporarily |
Slow purge time | Purge grade not viscosity-compatible or temperature mismatch | Align barrel/nozzle temps with purge resin; switch to a mechanical purge better suited to your resin |
Clean parts → then the sudden reappearance of old color | Hot runner manifold holding stagnant material | Increase continuous-flow purge; balance nozzle temps; cycle valve gates |
Specks + streaks only during startup | Degraded resin from the previous shutdown | Purge at elevated temps, then drop to production temps; avoid long idle times without purging |
Once you know which part of the system is causing the holdover, color changeovers become predictable instead of trial-and-error, and even the toughest pigments flush out in a fraction of the time.
Mechanical vs. Chemical Purge: Which Is Faster for Color Change?
Not all purging methods solve the same problem, and choosing the wrong one is the #1 reason color changes take longer than they should.
Mechanical Purging → Usually the Fastest for Color Change
Uses shear + high-viscosity displacement to physically scrub the screw, barrel, and NRV.
Best for: dark → light transitions, routine changeovers, pigment streaks/ghosting.
Why it’s fast: no soak time, strong scrubbing, reaches most color holdovers.
Chemical Purging → Best for Baked-On or Hidden Contamination
Uses heat-activated chemistry to break down residue in low-flow zones.
Best for: hot runners, carbon buildup, long-run degradation.
Why it’s slower: needs activation time; doesn’t remove pigment as quickly as mechanical purge.
Hybrid Purging → Fastest Full Reset
Chemical loosen → mechanical push-out.
Best for: stubborn ghosting, returning color after multiple purges, worn screws/NRVs.
Why it works: chemistry reaches trapped residue; mechanical purge removes it fast.
Note:
If the issue is pigment → use mechanical.
If the issue is baked-on residue → use a chemical.
If you’re fighting both → use a hybrid purge for the fastest, cleanest result.
How MD Plastics Improves Quick Color Change Performance
Fast, reliable color change depends on how efficiently the screw, barrel, and NRV evacuate the old melt. MD Plastics improves this upstream performance by addressing the mechanical causes of color hang-up, not just the purge material.
Engineered screw geometries reduce dead spots where pigments and masterbatch tend to accumulate.
Precision-machined NRVs (MDP™) maintain a true seal, preventing backflow that mixes old color into new melt.
Optimized barrels and nozzles improve thermal stability, reducing degradation and preventing “ghosting” during transitions.
Melt-Profiler™, Melt-IQ®, and Temp-Sense™ give processors real-time melt data, helping verify purge completion and diagnose color-retention issues before they reach production.
MD Plastics takes a scientific, analytical approach to improving melt preparation. By studying your screw, barrel, NRV behavior, and melt flow, we engineer solutions that remove dead spots, stabilize shear, and shorten color-change windows.
If you want faster, cleaner purges and more predictable color transitions, explore how MD Plastics can optimize your melt-delivery system.
Conclusion
Quick color changes are determined upstream, inside the screw, barrel, and NRV. When shear, pressure, melt uniformity, and thermal stability are under control, color transitions become faster, cleaner, and far more predictable.
A stable melt path minimizes hang-up, prevents ghosting, and cuts purge time dramatically.
If your changeovers are taking too long or if the old color keeps returning, the root cause is almost always in melt preparation or hardware condition, not the purge compound.
See how processors improved melt stability, reduced scrap, and increased profitability with MD Plastics’ engineered solutions.
FAQs
1. What’s the fastest way to purge for a color change?
Use a mechanical purge with high backpressure, high RPM, and short-shot cycles. This maximizes shear and displacement—the two forces that remove pigment fastest.
2. Do I need a special purge compound?
Not always. For simple transitions, a high-viscosity resin works. For stubborn pigments, metallics, or repeated streaking, a dedicated mechanical or chemical purge speeds the process.
3. Why does the old color keep reappearing?
Most often due to dead spots in the screw, NRV leakage, or low shear during purging. Hot runners can also retain color in low-flow areas.
4. Should I purge hot runners differently?
Yes. Hot runners require steady flow, balanced temperatures, and—if valve gates are present—open/close cycling to sweep each gate pocket.
5. Can screw or NRV wear cause slow color changeovers?
Absolutely. Wear creates pockets where pigment hides, and NRV leakage mixes old melt back into the new color. These are among the top causes of prolonged or incomplete purges.