Injection molding doesn't start at injection.
It starts the moment pellets drop into the barrel. Plasticizing is the conversion process that turns solid granules into the melt. Your screw design, barrel temperature, and rotation speed all determine how completely and uniformly this happens.
Incomplete plasticizing means inconsistent viscosity shot to shot. This translates to filling problems, visual defects, and mechanical weak points in the finished parts.
Most operators focus on injection and packing because that's when the mold fills. But your melt quality is already set before the screw moves forward. This article covers how plasticizing works, what influences it, and how to optimize it for repeatable results.
Key Takeaways
Plasticizing happens during screw recovery, not injection. Your melt quality is already set before the material enters the mold. Fix the problems at the source.
Temperature control alone won't save poor mixing. Back pressure and screw speed determine how well additives and colorants distribute throughout your melt.
Most quality issues trace to the barrel, not the cavity. Color streaks, weak weld lines, and dimensional drift start with inconsistent plasticizing.
Your screw design limits what materials you can run successfully. General-purpose screws struggle with engineered plastics, high-filler compounds, and recycled content.
Small plasticizing improvements compound across thousands of cycles. Stable melt conditions mean faster cycles, less scrap, lower energy use, and extended component life.
What Is Plasticizing in Injection Molding?
Think of plasticizing as your material prep stage.
Solid pellets enter the barrel. A rotating screw pushes them forward through heated zones. Friction from the screw and heat from the barrel melt the polymer into a uniform liquid.
What goes on inside the barrel:
Pellets compress and heat up as they move along the screw flights
Material reaches the glass transition temperature, then the melting point
Shear forces mix additives, colorants, and fillers throughout the melt
Homogenized plastic accumulates at the front of the barrel
This isn't just heating. Poor plasticizing leaves unmixed material, temperature variations, and trapped air. You see it as splay marks, color streaks, or brittle zones in your parts.
Good plasticizing delivers consistent melt temperature, complete mixing, and repeatable viscosity shot after shot. When it's working right, you notice because you stop fighting quality issues.
How Does the Plasticizing Process Work?
The process breaks into three zones along your barrel.
Feed Zone (rear section):
Pellets enter from the hopper. The screw channels are deepest here. Material stays mostly solid as it compacts and begins warming.
Set this zone below your polymer's melting point. Too hot, and you get bridging at the feed throat. Too cold, and the cycle time suffers.
Compression Zone (middle section):
Screw channels are gradually shallow. This squeezes the material, generating shear heat. The polymer transitions from solid to melt. Some polymers require a warm feed throat to prevent condensation or premature freezing.
This is where most of the mixing happens. Screw compression ratio matters here. Standard ratios run 2:1 to 4:1 depending on your material.
Metering Zone (front section):
Channels are shallowest. Material is now fully melted. The screw pumps homogenized plastic forward, and builds pressure.
You control melt temperature here through back pressure and screw speed adjustments.
Key process variables you need to control:
Parameter | What It Does | Impact on Quality |
|---|---|---|
Barrel temperature profile | Controls heat input per zone | Temperature variance changes viscosity and flow |
Screw RPM | Generates shear heating and mixing | Higher RPM = more shear heat, faster cycles |
Back pressure | Forces material through flights for better mixing | Low back pressure = inconsistent color/properties |
Residence time | How long material stays in barrel | Excessive time = thermal degradation risk |
The cycle within a cycle:
Screw rotates and retracts (plasticizing happens)
Melt accumulates in front of the screw
Screw stops at set position (shot size ready)
Screw moves forward as a ram (injection phase)
Cycle repeats
Most machines plasticize during the cooling time of the previous shot. This parallel processing keeps cycles tight.
Basic Requirements for Plasticizing
To achieve optimal plasticizing in injection molding, certain conditions need to be met. These requirements ensure the material flows smoothly and the process remains efficient:
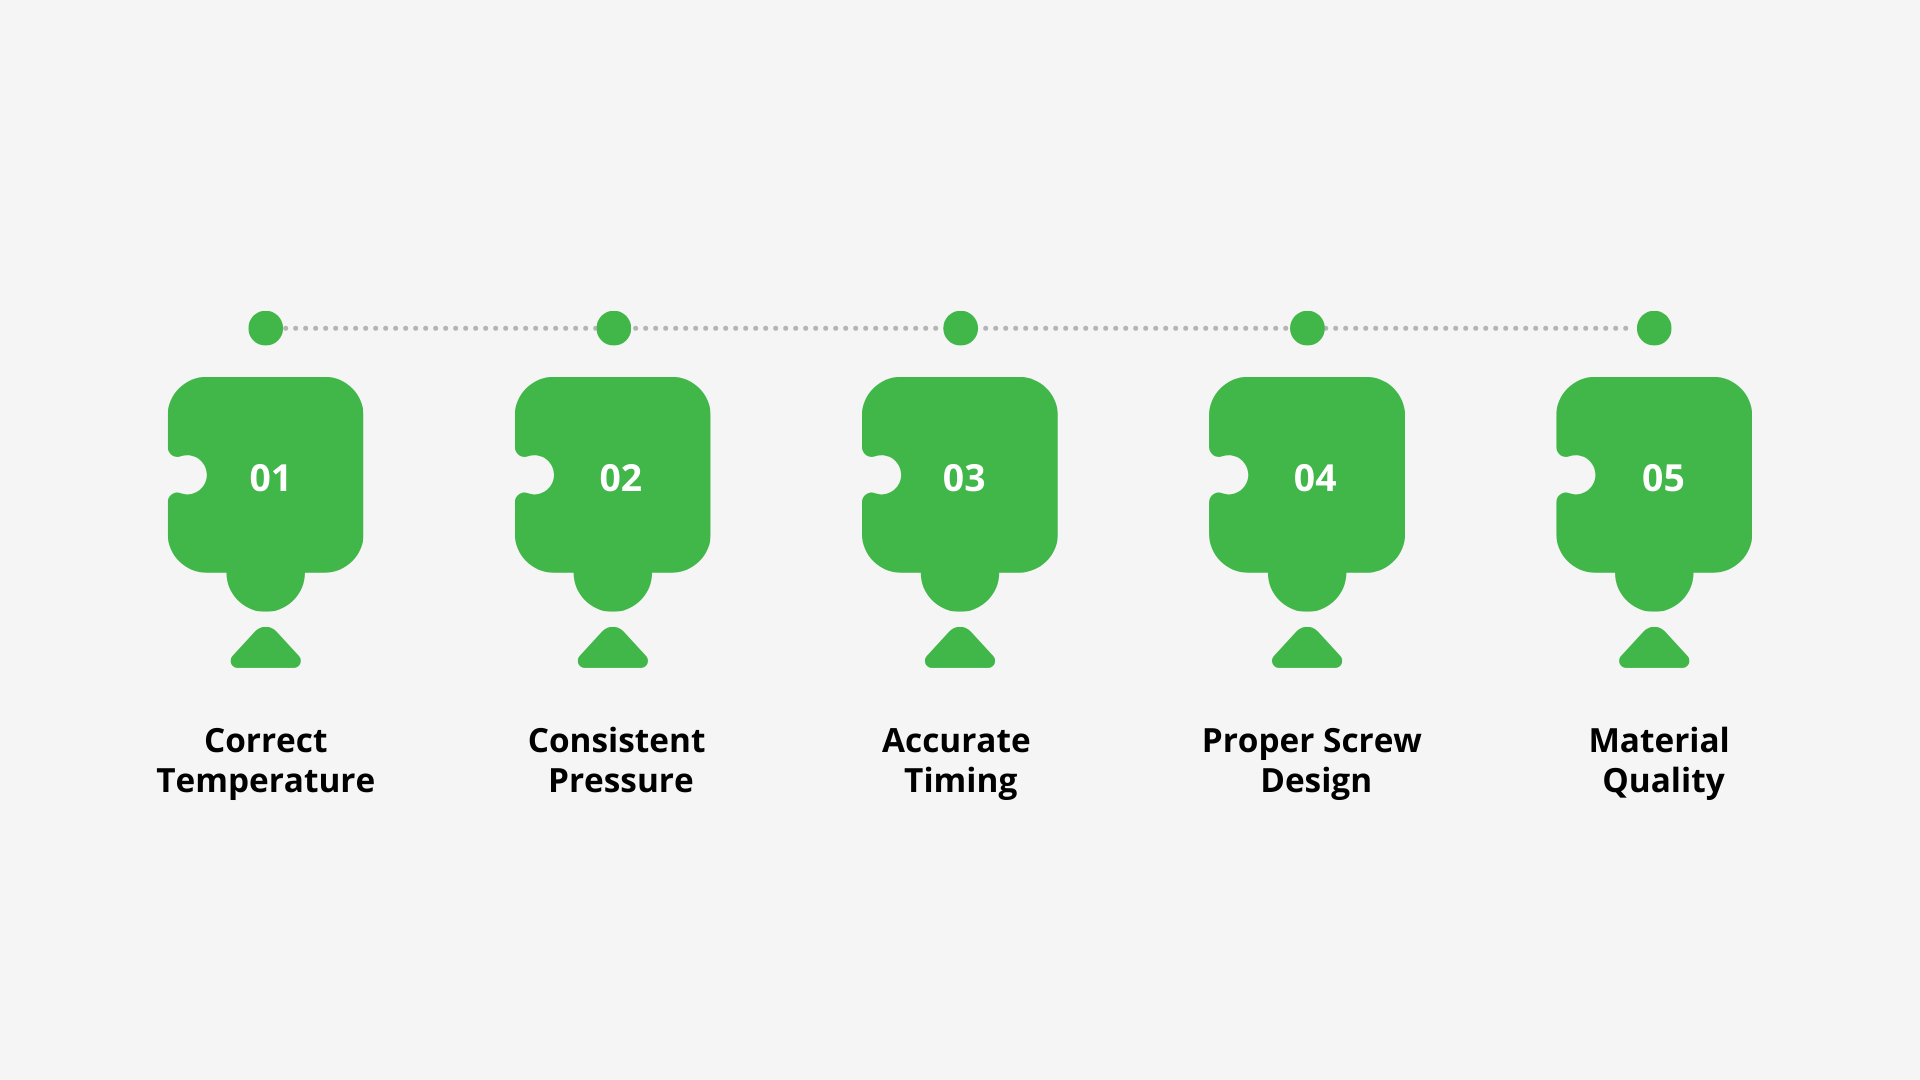
Correct Temperature: The barrel must reach the right temperature to melt the plastic without overheating or underheating.
Consistent Pressure: The screw needs to apply steady pressure to ensure the molten plastic is evenly distributed.
Accurate Timing: Proper timing ensures the material stays in a molten state long enough to fill the mold but doesn’t degrade.
Proper Screw Design: The screw should have the right geometry for efficient mixing and melting of the plastic.
Material Quality: Use high-quality, dry pellets to avoid contamination and prevent issues during melting.
Still struggling with inconsistent melting?
At MD Plastics, we’ve designed cutting-edge solutions that optimize plasticating for better results. Our Posi~Melt™ screw increases plastic exposure to the barrel wall by up to 60%, improving melt quality and ensuring higher output with lower volumetric compression.
Additionally, our Inject-EX™ Plasticating System revolutionizes melt uniformity, eliminating the deficiencies of traditional systems.
It’s engineered for precise mass displacement and consistent melt control, making it ideal for thermoplastics, thermoset materials, and more. The result? Higher quality melts, fewer defects, and lower operating costs.
Connect with us today to find out how MD Plastics can enhance your production efficiency.
Why Plasticizing Matters for Quality and Efficiency
Your mold can't fix what the barrel messed up.
Part consistency:
Melt temperature variation shows up immediately. Temperature differences between shots change flow behavior. You get short shots on some cycles, flash on others.
Incomplete mixing leaves visible defects:
Color streaks or swirls
Weld line weakness (unmixed material doesn't bond well)
Dimensional variation as viscosity fluctuates
Production speed:
Poor plasticizing forces you to slow down everywhere else.
Longer injection times to fill an inconsistent melt
Extended cooling to handle temperature variation
More packing pressure to compensate for viscosity changes
Optimized plasticizing means shorter cycles without quality trade-offs. Poor plasticizing adds seconds per cycle, which compounds across every shift.
Cost impact:
Scrap from melt quality issues hits your material budget directly. Color defects, incomplete fills, and weak weld lines all trace back to what happened in the barrel.
Rejected parts mean wasted resin, wasted machine time, and wasted labor. The earlier you catch plasticizing problems, the less expensive they are to fix.
Energy efficiency:
Stable plasticizing uses less power. When your process is dialed in, you're not reheating material multiple times or running excessive barrel temperatures to compensate.
Well-tuned processes consume less energy per kilogram of plastic processed. That difference adds up across hundreds of thousands of cycles.
Machine wear:
Inconsistent plasticizing means operators constantly adjust pressures and speeds. That cycling stresses hydraulics, increases screw wear, and shortens component life.
Predictable plasticizing extends screw and barrel life, improves check valve performance, and reduces maintenance frequency.
Benefits of Proper Plasticizing
Plasticizing is a critical step in injection molding that directly impacts the quality and efficiency of your production process.
It involves converting solid plastic pellets into a consistent molten state, which is essential for achieving smooth, reliable molding results. Here’s how plasticizing benefits your operations:
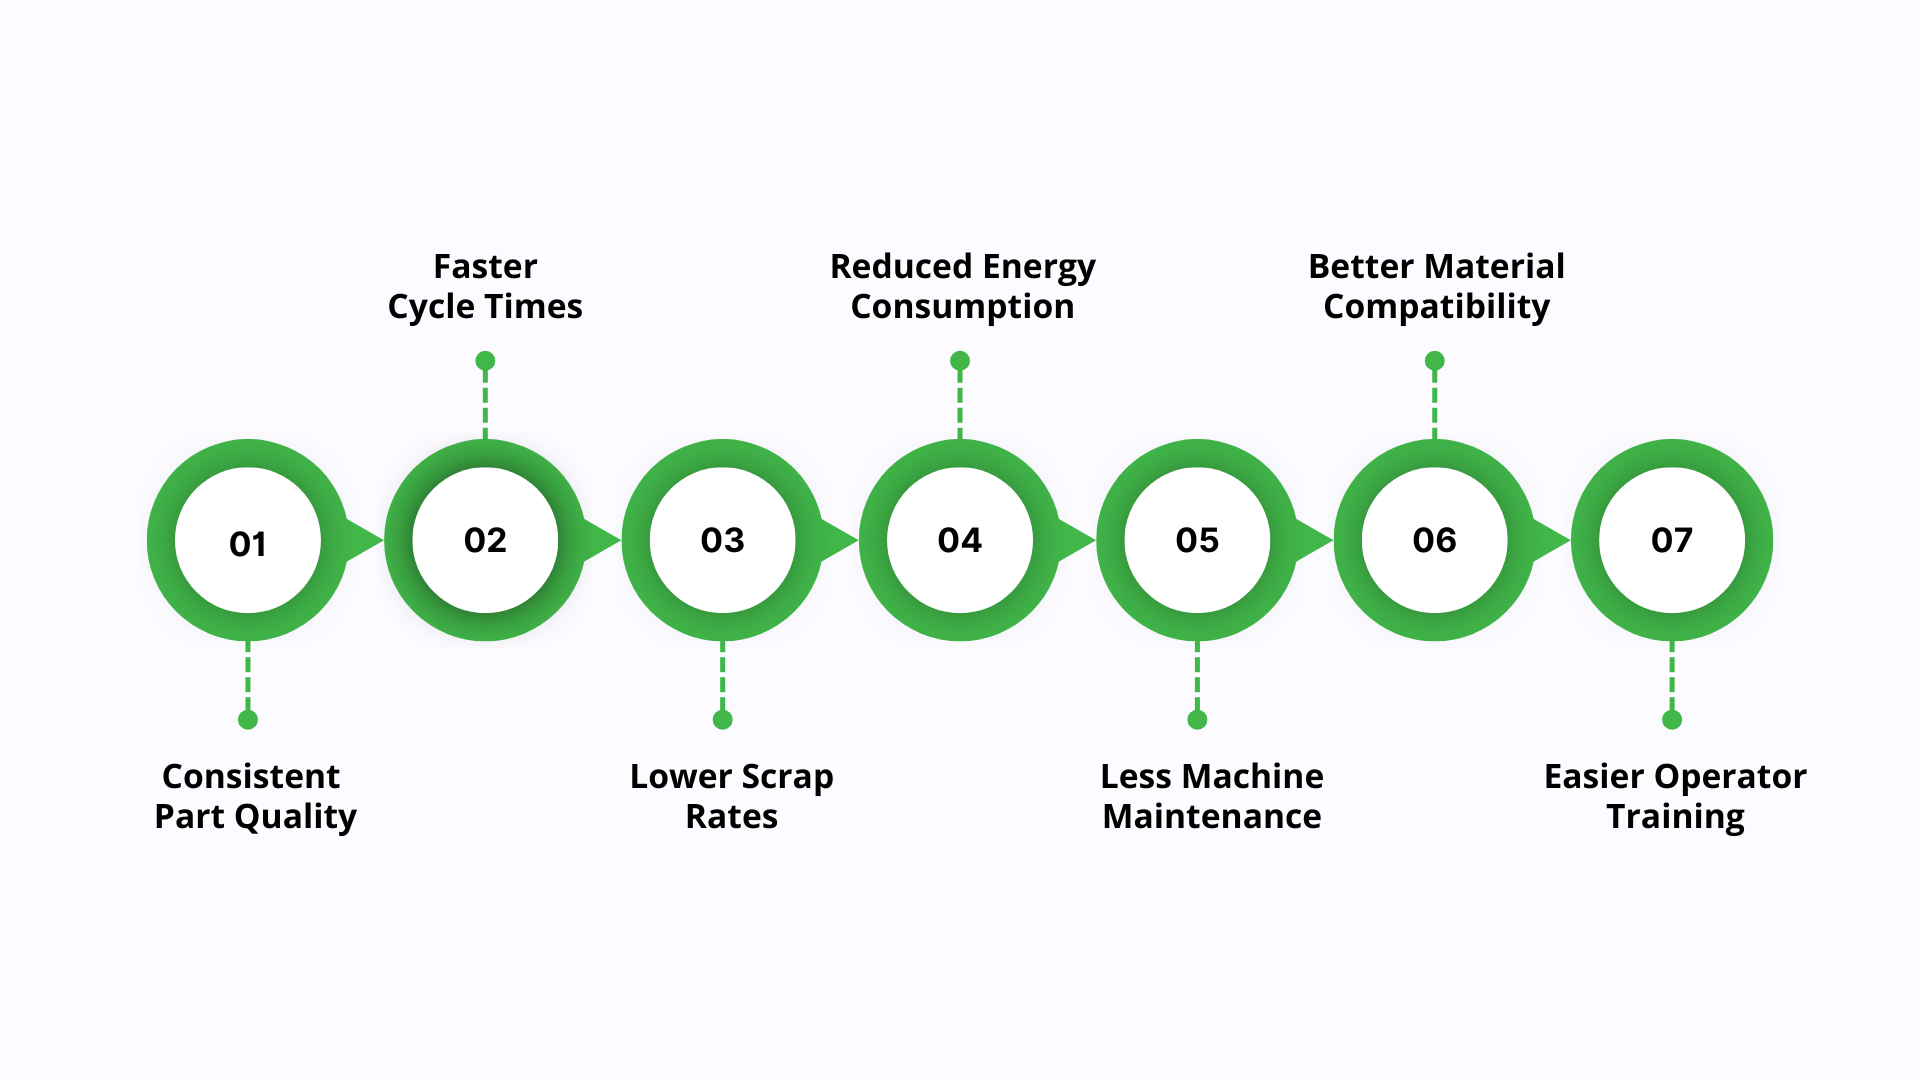
Consistent part quality: When melt conditions stay stable shot to shot, your parts match. Same dimensions, same appearance, same mechanical properties. No more sorting good parts from questionable ones. No customer complaints about batch variation.
Faster cycle times: Proper plasticizing means you're not compensating with longer injection or cooling phases. The process runs at optimal speed because the material behaves predictably. More parts per hour. Same labor cost, higher output.
Lower scrap rates: Mixed material flows correctly. Uniform temperature prevents short shots and flash. You spend less time adjusting and more time producing. Scrap goes down. Material utilization goes up. Your resin budget stretches further.
Reduced energy consumption: Efficient plasticizing uses only the energy needed to melt and mix. No excess barrel heat to overcome poor screw design. No extended residence time burning power. Your electricity meter notices the difference over thousands of cycles.
Less machine maintenance: Stable processes mean less wear on screws, barrels, and hydraulics. Components last longer when they're not constantly stressed by erratic pressure and temperature swings.
Better material compatibility: Proper plasticizing handles different resins reliably. You can run engineered plastics, recycled content, or color concentrates without constant troubleshooting. Flexibility matters when customer specs or material costs change.
Easier operator training: When plasticizing works correctly, new operators learn faster. The process is forgiving. Small variations don't cascade into quality issues. Less tribal knowledge required means faster onboarding, which equals consistent results across shifts.
Common Plasticizing Issues and How to Resolve Them
While plasticizing is essential for successful injection molding, there are a few common challenges that can affect performance. These include:
Issue: Color streaks or swirls
What you see: Uneven color distribution, streaky appearance, unmixed additives visible in parts.
Root cause: Insufficient mixing in the barrel. Back pressure too low, screw speed inadequate, or residence time too short.
How to fix it:
Increase back pressure gradually (check your material's shear sensitivity first)
Raise screw RPM if your polymer can handle additional shear heating
Verify the screw design has adequate mixing capability
Check that the colorant or additive is properly pre-mixed with the resin
Issue: Black specks or contamination
What you see: Dark spots, burnt material, or degraded plastic in finished parts.
Root cause: Material sitting too long in hot zones. Dead spots in screw flights. Previous material not fully purged.
How to fix it:
Reduce residence time by increasing shot size or shortening the delay between cycles
Lower barrel temperatures if they exceed material recommendations
Purge thoroughly when changing materials or colors
Inspect the screw and barrel for wear, creating trapped material areas
Check the non-return valve for proper sealing
Issue: Inconsistent shot weight
What you see: Part weight varies shot to shot. Dimensions drift. Some parts slightly short, others with excess flash.
Root cause: Unstable plasticizing creates varying melt density. Check valve leakage. Inconsistent screw recovery position.
How to fix it:
Verify back pressure setting is adequate and consistent
Check cushion remains stable (should be at least 3-6mm)
Inspect the non-return valve for wear or damage
Ensure hopper material flow is consistent (no bridging)
Monitor melt temperature shot to shot
Issue: Long cycle times
What you see: Screw recovery takes longer than expected. Machine waiting for plasticizing to complete before the next injection.
Root cause: Insufficient heating capacity, worn screw reducing pumping efficiency, or back pressure set too high.
How to fix it:
Check all heater bands are functioning correctly
Verify barrel temperature profile matches material requirements
Reduce back pressure if mixing quality allows
Inspect the screw and barrel for wear affecting material conveyance
Consider if the shot size exceeds the machine's plasticizing capacity
Issue: Splay marks or surface defects
What you see: Silver streaks, gas marks, or surface blemishes radiating from gate.
Root cause: Moisture in material, trapped air in melt, or excessive shear creating gas.
How to fix it:
Dry hygroscopic materials properly before processing
Reduce screw RPM if generating excessive shear heat
Lower back pressure slightly to allow trapped air to escape
Check for air leaks in the feed throat or hopper connection
Verify vent positions if using a vented barrel
Issue: Material degradation
What you see: Discoloration, brittle parts, reduced physical properties, burnt smell.
Root cause: Barrel temperatures too high, excessive residence time, or too much shear heating.
How to fix it:
Lower barrel temperature profile throughout all zones
Reduce screw speed if shear-sensitive material
Minimize delays between shots
Check actual melt temperature with pyrometer
Verify material grade matches your process requirements
Quick diagnostic checklist:
When plasticizing problems appear, check these first:
All heater bands are functioning
Thermocouple readings accurate
Back pressure setting an appropriate for the material
Screw speed within the recommended range
Cushion position stable
Material properly dried (if hygroscopic)
No hopper bridging or feed interruption
Non-return valve sealing properly
Screw and barrel wear within acceptable limits
Most plasticizing issues trace to one of these variables. Fix the root cause, not the symptoms.
How Your Equipment Affects Plasticizing
Your machine capabilities set the boundaries for what's possible.
Screw design matters:
Not all screws work for all materials. A general-purpose screw handles commodity resins reasonably well. Engineered plastics, recycled content, or high-filler materials need specialized screw geometry.
Three main screw types:
Screw Type | Best For | Key Feature |
|---|---|---|
General purpose | PP, PE, PS, ABS | Balanced compression, works for most applications |
Barrier screw | Heat-sensitive materials, consistent output | Separates solid and melt for better control |
Mixing screw | Color consistency, additives, regrind | Enhanced mixing sections for homogeneity |
Using the wrong screw means fighting your equipment. You'll compensate with temperature, pressure, or speed adjustments that create new problems.
Need custom screws for tough materials like high-temp or bio-based polymers? MD Plastics designs and builds custom screws that are perfect for processing these materials efficiently, helping you achieve smoother and more reliable production.
Contact us today for a free quote.
Barrel heating capacity:
Your heater bands need enough wattage to maintain temperature under production conditions. Undersized heating struggles when running fast cycles or processing high-volume shots.
Signs your heating is marginal:
Temperature drops during high-demand periods
Recovery between cycles takes progressively longer
Inconsistent melt temperature despite stable setpoints
Upgrading heater bands or adding zones solves this permanently. Turning up the temperatures to compensate just degrades the material.
L/D ratio (length to diameter):
This tells you how much barrel length you have relative to screw diameter. Standard machines run 18:1 to 24:1.
Longer barrels (higher L/D, typically 24:1 to 30:1) provide:
More residence time for thorough melting
Better mixing capability
Easier handling of heat-sensitive materials
Shorter barrels work fine for fast-cycling, easy-flowing resins. Complex materials need the extra length.
Non-return valve condition:
This check valve stops the melt from flowing backward during injection. When it wears, the material leaks back during the injection stroke.
You see it as:
Inconsistent shot size
Cushion position varying
Longer injection times needed
Replace non-return valves on schedule. They're cheaper than the scrap they prevent.
Back pressure control:
Hydraulic machines control back pressure mechanically. Electric machines offer more precise digital control.
Better control means:
Finer adjustment of mixing intensity
More consistent shot-to-shot behavior
Easier optimization for difficult materials
If your machine has limited back-pressure control, you work within a narrower processing window.
Screw speed capability:
Maximum RPM varies by machine size and design. Faster isn't always better, but having the range matters.
High-speed capability helps with:
Short cycle applications
Materials needing more shear heating
High-volume shots requiring fast recovery
Low-speed capability matters for:
Shear-sensitive materials
Achieving gentle mixing without degradation
Processing recycled or regrind content
Temperature control zones:
More zones give you finer control over the heating profile. Basic machines have three zones. Better machines offer four to six.
Additional zones help when:
Running wide temperature ranges (hot nozzle, cooler feed)
Processing heat-sensitive materials
Optimizing energy efficiency
Machine capacity vs shot size:
Running at the upper limit of your machine's shot capacity stresses plasticizing. Best practice keeps shot size between 25–65% (ideal) and 20–80% (acceptable depending on material).
Too small: Excessive residence time, material degradation risk.
Too large: Incomplete melting, inconsistent quality, slow recovery.
When to consider equipment upgrades:
Your machine might be limiting you if:
You constantly fight plasticizing issues despite the correct settings
Material changes require extensive retuning
Cycle times can't reach the target despite optimized cooling
Scrap rates stay high across multiple materials
Sometimes the process isn't the problem. The equipment is.
If you're experiencing any of these challenges, it might be time for an upgrade. Our Inject-EX™ Plasticating System offers:
Consistent, uniform melt quality for greater precision
Faster cycle times with reduced energy consumption
Enhanced control over material flow and shot size
Ready to upgrade? Get a free quote today and see how the Inject-EX™ system can elevate your production.
Conclusion
Plasticizing is essential to the success of your injection molding process. By understanding its key requirements and overcoming common challenges, you can significantly improve product quality and operational efficiency. Whether you're optimizing cycle times or reducing scrap rates, a well-executed plasticizing process is key to staying competitive.
How MD Plastics Can Help
MD Plastics offers custom-designed Posi~Melt™ screws and high-performance barrels to optimize your plasticizing process. Our Inject-EX™ Plasticating System enhances melt quality, improves cycle times, and provides greater precision for your materials.
Get in touch today to explore how our solutions can elevate your production efficiency.
FAQs
1. What is plasticizing in injection molding?
Plasticizing is the process of melting plastic pellets into a uniform liquid using heat and mechanical force, preparing them for injection into molds.
2. Why is screw design important for plasticizing?
Screw design affects the efficiency of melting and material mixing, ensuring the right consistency for different materials and preventing plasticizing issues.
3. How does temperature impact plasticizing?
The right temperature ensures that the plastic melts uniformly. Too hot or too cold can lead to defects, poor flow, or inconsistent parts.
4. What happens if the plasticizing process is incorrect?
Incorrect plasticizing can result in poor part quality, higher scrap rates, inefficient cycle times, and increased costs due to material waste and defects.
5. When should I consider upgrading my equipment?
Consider an upgrade if you’re facing consistent plasticizing issues, high scrap rates, extended retuning periods, or when your current machine can’t meet production targets.