Walk out to any extrusion line and ask three engineers where melting actually happens inside the screw, and you’ll get three different answers. Some point to barrel heaters, others to screw speed, others to material grade.
Yet the real melt formation follows a very specific sequence inside the screw channel, and when that sequence is disrupted even slightly, the entire process feels “off”: unstable pressure, inconsistent viscosity, color streaks, unmelt, higher scrap, lower throughput.
The problem isn’t that teams don’t care about melt quality. It’s that most plants rely on signals that reveal the symptoms, not the cause. Melt temperature, amps, backpressure, and even product appearance tell you something is wrong, but not why.
This article cuts straight to the “why.” We break down what melting actually is inside a single-screw extruder, where it happens, what controls it, and the design factors that quietly make or break melt quality every day.
Key Takeaways
For most resins, especially polyolefins, shear provides the majority of melting energy inside the screw, while the barrel heaters define the thermal boundary and initiate the melt film at the barrel wall.
Where melting happens determines quality; shifting melt location leads to gels, unmelt, surging, and viscosity drift.
Screw geometry controls the melt path, and even small wear or design mismatches disrupt melting and throughput.
Real-time melt monitoring beats guesswork, revealing early wear, melt instability, and process variation before defects appear.
Engineering-led upgrades matter—optimized screws, valves, and melt profiling tools (like MD Plastics’ Posi-Melt™ and Melt-Profiler™) consistently improve melt uniformity and output stability.
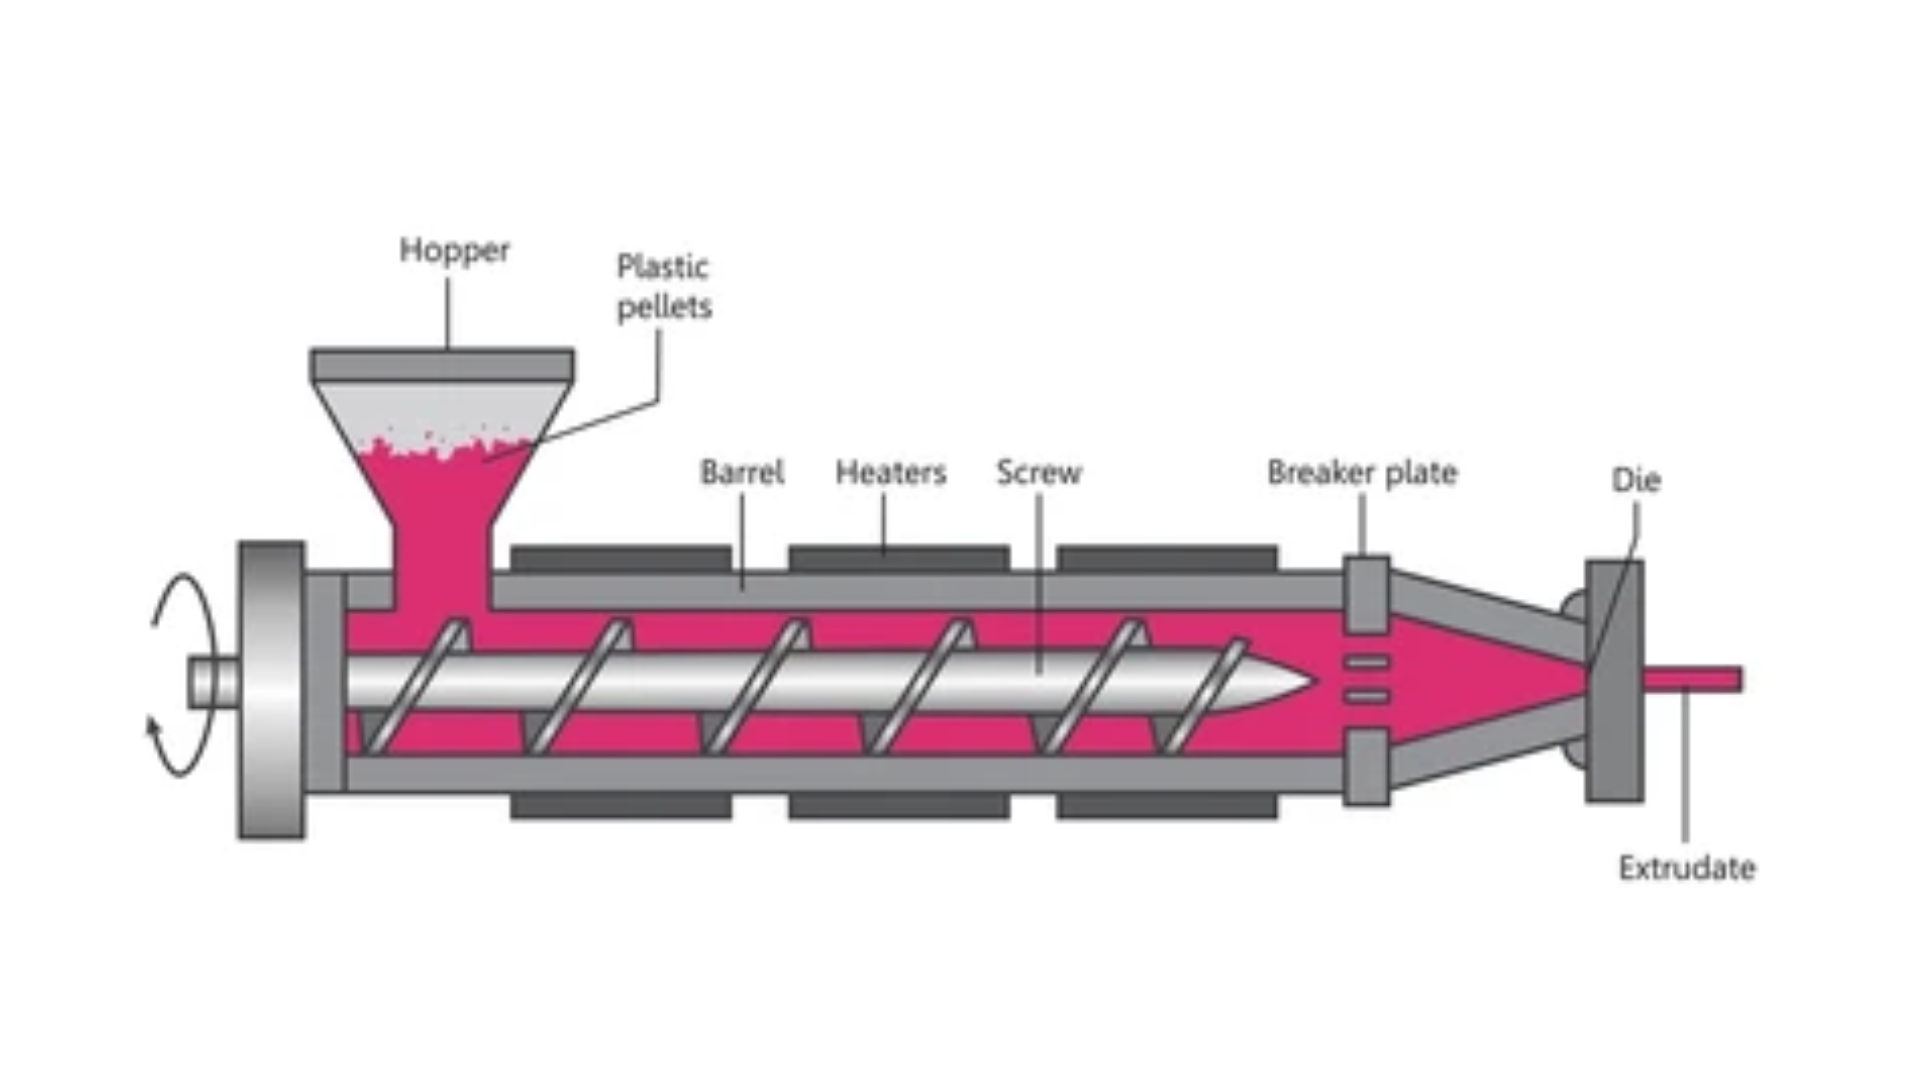
What “Melting in a Screw Extruder” Actually Means
In extrusion, melting isn’t simply about heating plastic until it becomes a fluid. In a single-screw extruder, melting is a combined thermal–mechanical process driven by conduction, shear, friction, and pressure.
While barrel heaters soften the polymer, the actual melt formation happens inside the screw channel, not at the barrel surface, making melting a dynamic process rather than a temperature reading.
Why Most Plants Misdiagnose It
Many plants misdiagnose melting issues because they assume:
Barrel heaters are responsible for most of the melting
“Softening” equals full melt homogeneity
Melt temperature = melt quality
Higher shear always indicates overheating
A stable temperature profile means a stable melt
In reality, the largest contributor to melting is shear heating generated in the compression zone as solids compact, deform, and begin to form a melt film.
Conduction from the barrel, internal friction between pellets, and pressure buildup all support the process, but none can replace proper shear and controlled channel geometry.
Understanding this difference is critical. Melting determines homogeneity, viscosity stability, shot consistency, color dispersion, and throughput efficiency. When melting is incomplete or uneven, the results are immediately apparent: poor surface finish, gels, splay, flow hesitation, high scrap, and unstable output.
Getting melting right is the foundation of any high-performance extrusion or injection molding process, and it starts with understanding what’s really happening inside the screw.
How Melting Happens Inside a Single Extruder Screw
Melting inside a single-screw extruder follows a defined path. When the screw is designed correctly and the process is tuned, the polymer transitions cleanly from solid to a fully homogenized melt. Here’s how that journey unfolds and the factors that control it.
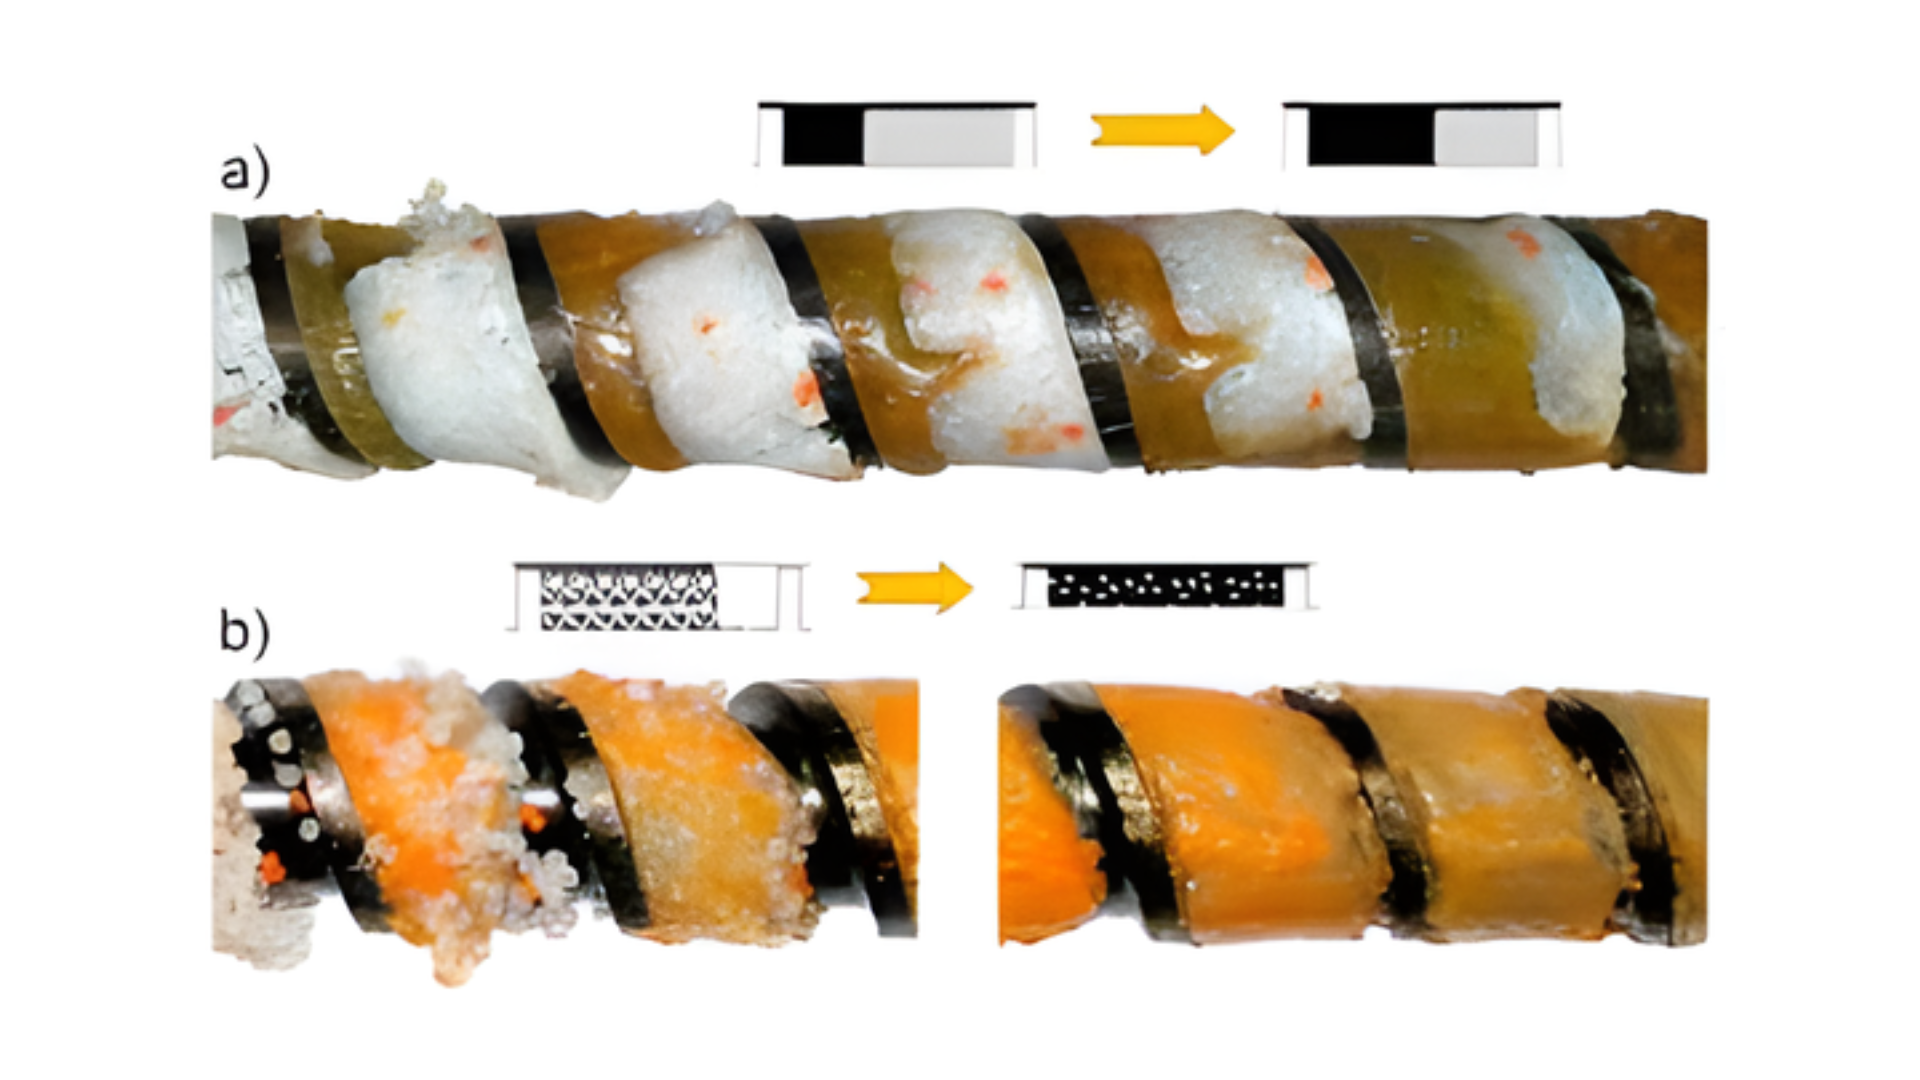
1. The Melting Path: Feed → Transition → Metering
Feed Zone: Pellets are compacted and conveyed forward. The goal here is consistent solids conveying, not melting.
Transition/Compression Zone: Channel depth decreases, pressure rises, and a melt film forms on the barrel wall. This is where melting begins.
Metering Zone: Material should be fully molten and homogenized. Stable pressure here drives consistent output and downstream quality.
Early melting can also cause screw slippage, reducing solids conveying efficiency.
2. How Heat Actually Enters the Polymer
Melting is driven by multiple energy sources, each contributing differently:
Conduction: Initial warming as pellets contact the barrel.
Frictional Work: Generated by compacting solids moving under pressure.
Shear Heating (Primary Source): Mechanical work from the screw flights stretches and deforms the polymer.
Barrel Heat: Supports melt formation but rarely drives it.
Shear heating, not heater bands, is responsible for most of the melt formation inside the screw.
3. Barrel Temperature vs Shear Heating
Barrel heat sets the thermal environment, prevents cold starts, and protects temperature-sensitive resins.
Shear heating determines where and how quickly melting occurs.
Excess reliance on barrel heat often hides deeper design or wear problems.
Barrel heaters influence surface temperature; screw mechanics influence actual melting.
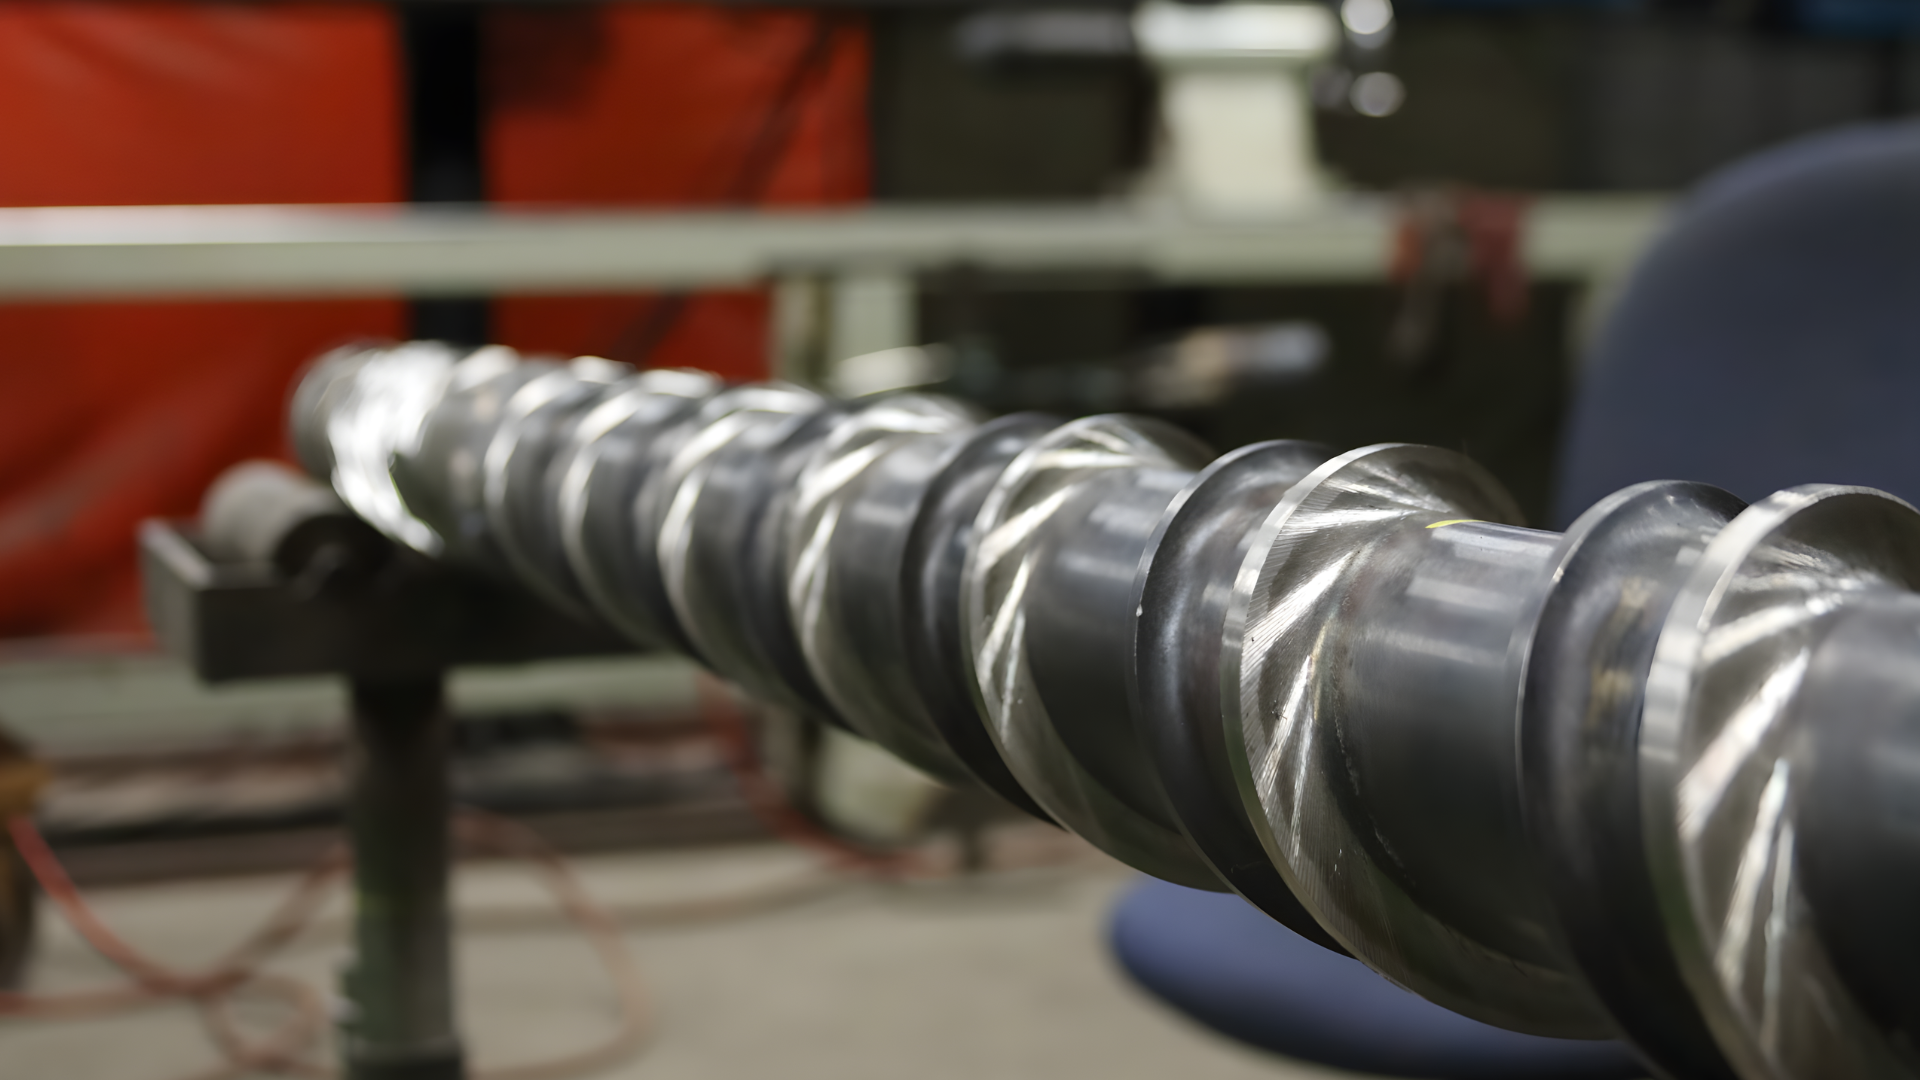
4. Screw Geometry Elements That Control Melting
The screw acts as a melting machine. Its geometry determines the melt rate, the melt quality, and the stability of the whole process.
Key geometry factors:
L/D Ratio: More length = more residence time and energy input.
Compression Ratio: Controls how aggressively solids convert to melt.
Flight Depth & Channel Profile: Sets pressure, shear intensity, and melt uniformity.
Zone Proportions: Determine where melting starts and how fully it completes.
Helix angle and flight width influence solids conveying and the rate at which the melt pool develops.
Why engineers care: Even small geometry changes shift melting upstream or downstream and directly affect throughput and quality.
5. Material Behavior, Process Settings & Wear
Melting doesn’t happen in isolation. Several variables change how energy moves through the material:
Material Properties
Semi-crystalline resins need more energy to transition
Hygroscopic materials require proper drying. Moisture not only causes splay but also alters the melting rate and apparent viscosity due to hydrolytic degradation.
Fillers and additives alter shear response
Process Settings
Screw speed: Higher speed = more shear work
Backpressure: Improves mixing and homogenization
Temperature profile: Creates the thermal boundary for melting
Wear Impact
Worn screws/barrels increase channel depth
Compression drops → melting shifts downstream
Output becomes inconsistent, and viscosity fluctuates
When wear changes geometry, melting relocates, and the process becomes unstable even if temperatures stay “normal.”
Common Melting Problems in Single Extruder Screws & How to Fix Them
When melting isn’t happening where the screw expects it to, the machine doesn’t usually fail outright; it just behaves strangely. Rates shift for no clear reason. The die pressure refuses to settle. Color concentrates behave differently from run to run.
These subtle shifts often point straight to melting inefficiencies inside the screw.
Below is a concise, engineer-focused troubleshooting guide to help diagnose what’s actually going wrong.
1. Incomplete or Delayed Melting
How it shows up: Unmelt specks, gels, rough surfaces, inconsistent viscosity.
What usually causes it:
Melting starts too late in the screw
Low mechanical energy in the transition zone
Loss of compression due to wear
Resin moisture or incorrect drying
Fix it by:
Increasing screw speed slightly to raise shear generation
Rechecking drying parameters
Inspecting screw/barrel wear
Optimizing mid-zone temperatures
2. Overheating or Polymer Degradation
How it shows up: Burn marks, brittle parts, odor, color shift, black specs.
What usually causes it:
Excess shear in the compression/metering zones
Overheated barrel profile
Sensitive resins running too close to thermal limits
Fix it by:
Reducing screw RPM or backpressure
Softening the temperature profile
Evaluating screw wear that may be creating local shear spikes
3. Surging or Pulsating Output
How it shows up: Cyclic flow at the die, weight variation, and dimensional drift.
What usually causes it:
Melting, jumping forward/back along the screw
Unstable solids conveying
Compression zone mismatched to resin
Fix it by:
Checking hopper/feeding consistency
Measuring wear in the transition zone
Considering a screw geometry with more stable compression characteristics
4. Poor Color or Additive Distribution
How it shows up: Streaks, swirls, inconsistent masterbatch performance.
What usually causes it:
Limited distributive/dispersive mixing
Melt forming too early, leaving less mixing length
Backpressure too low
Fix it by:
Increasing backpressure in small increments
Evaluating the effectiveness of the mixing section
Adjusting temperature zones to prevent premature melt pooling
5. Low Throughput or High Energy Use
How it shows up: Line running slower than expected, high motor load.
What usually causes it:
Early melt formation causing drag
Low melt uniformity is slowing the flow
Barrel temperatures are too low for the material
Fix it by:
Optimizing zone temperatures for smoother transition
Checking whether the screw geometry fits the output target
Inspecting the screw root for wear
6. Melt Quality or Temperature Drift
How it shows up: Unpredictable melt temp, part weight variation, unstable downstream behavior.
What usually causes it:
Channel depth change due to wear
Melting location shifting between cycles
Screw speed too close to instability threshold
Fix it by:
Inspecting the barrel and screw for wear patterns
Adjusting RPM to stabilize shear
Using melt-pressure/temperature sensors to track real-time behavior
When you look closely, nearly every melting symptom leads back to the screw’s geometry and how it manages energy inside the barrel, which makes screw design the logical next focus.
Screw Design’s Role in Melt Quality
A screw isn’t just a conveying device; it’s the primary engine that determines how melting develops and how reliably the melt behaves downstream.
Its geometry controls how mechanical energy is introduced, how solids transition into a melt, and how uniformly the polymer is conditioned before it leaves the barrel.
When melt quality becomes unpredictable, the screw’s design is often the underlying cause.
General-Purpose Designs vs Engineered Geometries
A GP screw performs adequately for many commodity resins, but engineered resins often benefit from tailored compression, mixing, or barrier geometry.
Production teams typically notice these limitations when materials change, output targets increase, or tighter quality windows are required. Symptoms include temperature drift across runs, uneven color dispersion, or lower throughput with higher-viscosity resins.
Engineered screws address these issues by tailoring how and where energy is delivered. They refine:
Channel depth to control shear intensity
Compression ratio to guide the solids-to-melt transition
Flight geometry to build stable pressure
Zone lengths to align the melting behavior with resin characteristics
The result is a melt stream with far more consistent temperature, density, and flow run after run.
Barrier Screws and Controlled Melting
Barrier screws use a secondary flight to separate solids from the melt, ensuring that melting progresses in a defined and controlled manner.
This structure prevents partially melted material from migrating too early into the melt channel, which can otherwise cause gels, viscosity instability, or output variations.
A well-designed barrier screw delivers:
A reliably located melting point
Clean separation of solid and molten polymer
Reduced the risk of unmelt
Improved throughput and thermal stability
Resins like PP and HDPE benefit significantly from this level of control, especially in higher-output settings.
Mixing Sections: When Melt Homogeneity Matters
Once the polymer is fully molten, mixing elements finish the job by refining temperature uniformity and blend quality. Designs such as spiral mixers, Maddock-style mixers, keyed mixers, and XLA-type geometries help:
Even out temperature gradients
Disperse colorants and additives
Break up residual gels
Improve melt density consistency
These aren’t melting devices; they are conditioning tools that finalize the melt before it reaches the die or the injection unit.
They’re essential in applications where visual appearance, dimensional accuracy, or filler uniformity is critical.
Choosing Between Single-Screw, Twin-Screw, or Custom Designs
Different screw designs deliver different strengths. The table below summarizes when each approach offers the greatest advantage.
Scenario / Requirement | Single-Screw Excels When… | Twin-Screw or Custom Screw Is Justified When… |
|---|---|---|
Melting Behavior | Resin has a predictable melting profile | Material requires strong distributive/dispersive mixing |
Additives & Fillers | Additive packages are simple or low-percentage | High filler loading or precise additive incorporation is required |
Throughput Goals | High throughput with moderate mixing is the priority | Mixing quality is more critical than raw output rate |
Shear Requirements | Stable, repeatable shear supports the process | Resin is shear-sensitive or requires tight shear control |
Thermal Sensitivity | Resin tolerates typical thermal gradients | Reactive or temperature-sensitive materials demand precise heat management |
Downstream Demands | The product tolerates small variations in the melt | Melt quality directly drives performance (medical, optical, multilayer) |
Operational Efficiency | Lower energy use and simpler mechanics are desired | Complexity is acceptable for better uniformity |
Cost & Maintenance | Lowest operating cost and easy maintenance | Higher cost/maintenance justified by process needs |
Summary:
A well-engineered single-screw remains the most efficient and cost-effective choice for polyolefins, commodity materials, and high-volume production.
A twin-screw or custom geometry is warranted when mixing intensity, filler dispersion, or thermal precision becomes the limiting factor.
A Practical Decision Framework for Engineers
Use the following decision path to evaluate which design best fits your operation:
Is the melting inconsistent or shifting along the screw?
→ Consider engineered geometry or a barrier design.
Is color or additive dispersion unreliable even with full melt?
→ Add or upgrade mixing elements.
Does the resin require strict thermal or shear control?
→ Twin-screw or hybrid configurations may be appropriate.
Is high-throughput production the priority?
→ Optimized single-screw typically delivers the best efficiency.
Are defects tied to wear rather than design?
→ Measure channel depth and compression loss before redesigning.
This framework helps prevent unnecessary redesigns or expensive twin-screw upgrades when a tailored single-screw solution can often resolve the issue.
Real-Time Monitoring for Melt Performance
The challenge with melting is that most of it happens out of sight. Operators see barrel temperatures, screw speed, and product output, but none of those indicators reveal how the melt is actually forming inside the screw.
Real-time monitoring closes that gap.
By tracking what the polymer is doing, not just what the machine is set to do, plants gain a clear view of how stable, efficient, and repeatable their melting process really is.
Melt profiling focuses on three core signals:
How evenly is temperature distributed in the melt?
Does pressure remain stable across cycles?
How does viscosity behave under load?
These measurements describe the melt’s actual condition, not the assumed condition based on heater settings.
A stable temperature profile suggests consistent melting; fluctuating melt pressure indicates irregular shear or shifting compression; viscosity drift often points to changes in melting location or energy input.
Engineer Insight: A gradual drop in melt pressure over weeks is one of the earliest signs of screw or barrel wear, even when parts still look acceptable.
Sensors serve as a diagnostic tool in this context. They reveal when the melt front is creeping downstream, when shear work is too aggressive for a sensitive resin, or when a transition zone no longer delivers enough mechanical energy.
Real-time curves make these trends unmistakable, and help teams act before inconsistencies turn into scrap.
Beyond troubleshooting, continuous melt monitoring supports smarter process optimization.
It allows engineers to match screw speed and backpressure to the resin’s ideal viscosity range, stabilize startup conditions, and maintain consistent performance across shifts and material lots.
For facilities running high-volume lines or tight-tolerance products, this level of visibility transforms melting from a reactive task into a measurable, controllable parameter.
When to Repair, Retrofit, or Replace a Single Extruder Screw
A screw rarely fails all at once; its performance fades gradually. The rate drops a little, the melt gets harder to stabilize, and the machine needs more micro-adjustments to stay on target.
When these shifts become regular rather than occasional, it’s time to evaluate whether the screw needs repair, a design retrofit, or full replacement.
When a Repair Makes Sense
Repair is the right choice when wear is present, but it hasn’t changed how the screw melts or pressurizes the polymer.
Situations that justify repair include:
Early-stage flight wear
Minor rounding of edges
Compression is still within recoverable limits
Resin types and throughput targets unchanged
In these cases, reconditioning restores geometry without the cost of replacement, and performance typically returns to baseline.
When a Retrofit Delivers Better ROI
A retrofit becomes the smarter path when the screw is still mechanically sound, but the process has evolved.
Common triggers include:
Switching to resins with different melting characteristics
Higher color/additive loading requires improved mixing
Throughput targets are increasing beyond the current screw capability
Operators compensating for variability with more adjustments
A retrofit lets you update geometry barrier features, mixing sections, and compression ratios without replacing the entire unit. It’s a strategic upgrade, not a repair.
When Replacement Is the Right Call
Replacement is unavoidable when wear changes the screw’s behavior in ways no amount of tuning can fix.
Clear indicators:
Compression loss is pushing melting too far downstream
Difficulty holding melt pressure despite stable settings
Rising motor load and energy consumption
Variation that returns even after adjustments
Once geometry drifts beyond the recoverable range, a new screw restores the melt path to where the process expects it to be.
A Quick ROI Lens: If scrap levels, energy use, or rate loss exceed the cost of repair or replacement, the decision has already made itself. Stable melting is always cheaper than inconsistent melting.
How MD Plastics Solves Melting Inefficiencies
MD Plastics takes an engineering-led approach to melt preparation. Rather than offering generic screws or standalone components, they design plasticating systems that improve how the polymer is heated, mixed, and delivered inside the machine.
Their focus is on melt quality, process stability, and component precision, all of which directly influence melting performance.
Posi-Melt™: Screw Designs That Improve Melt Homogeneity
MD Plastics’ Posi-Melt™ screws are designed to enhance melting efficiency and consistency by improving:
Exposure of material to the heated barrel surface
Distributive and dispersive mixing
Melt temperature uniformity
Throughput efficiency
These screws are engineered to help reduce unmelted resin, improve melt uniformity, and support stable downstream processing, especially in resins like PP, HDPE, ABS, PC, nylon, and other materials commonly used in injection molding and extrusion.
Custom-Engineered Screws & Barrels for Specific Applications
MD Plastics provides custom screw and barrel geometries tailored to a customer’s machine, resin, and processing requirements. Their engineering process typically considers:
Resin type and melting characteristics
Expected throughput
Machine size and operating window
Mixing or homogenization needs
This allows plants to solve issues that generic GP screws cannot—whether the goal is better melt uniformity, improved energy efficiency, or stable operation with challenging resins.
Non-Return Valves Designed for Consistent Melt Delivery
MD Plastics manufactures MDP™ non-return valves and related melt-delivery components. These are built to:
Provide a reliable shutoff
Reduce backflow
Maintain consistent shot volume (in injection molding)
Avoid shear pockets that disturb melt quality
Stable, predictable melt delivery is a critical part of controlling downstream part quality, especially in technical molding applications.
Melt-Profiler™ & Melt-IQ®: Real Melt Data for Better Decisions
MD Plastics offers melt-monitoring and sensing technology, including the Melt-Profiler™, Melt-IQ®, and Temp-Sense™ systems. These tools allow processors to measure:
Melt temperature
Melt pressure
Viscosity patterns
Melt stability over the cycle
This gives engineers real-time insight into how melting is occurring inside the barrel, helping identify wear, inconsistent melting behavior, or shifts in resin behavior that would otherwise be invisible.
Retrofitting & Upgrading Existing Plasticating Systems
One of MD Plastics’ key advantages is their ability to upgrade existing molding and extrusion machines with:
New screw/barrel combinations
More efficient non-return valves
Updated mixing or barrier geometries
Melt-monitoring sensors
This enables older machines to achieve better melt consistency and performance without requiring full machine replacement.
If your current screw, valve, or melt-monitoring setup isn’t providing stable melt quality, MD Plastics can evaluate your process parameters and engineer components that better match your resin, machine, and production goals. Contact MD Plastics Today!
Final Takeaway:
Melting in Screw Extruders Is a Design + Process Equation.
Melting doesn’t come down to temperature settings alone, and it’s never just a screw problem or just a process problem. It’s the interaction of geometry, resin behavior, shear, pressure, and real-time feedback that determines whether the melt forms cleanly and consistently.
A well-designed screw will only perform as intended if the process supports it. And even the most carefully tuned process will struggle if the screw geometry no longer matches the resin or throughput demands.
The plants that achieve stable melt quality align design with process, monitor what’s happening inside the barrel, and make decisions based on data, not assumptions.
If you control the melt path, you control the outcome. Everything else is noise.
And if you want your melt behavior to match your production goals and not fight them, MD Plastics can help you engineer a screw and melt system that eliminates variations at the source.
To see how these principles play out in real production environments, explore our Melt Profiler™ VII Case Study, which demonstrates how melt temperature fluctuations impact part quality—and how real-time melt data helps fix them.
FAQs
Q1: Why does my single-screw extruder still produce unmelted or gel even though the barrel temp is high?
A1: Because barrel temperature is only one part of the melting equation. In a single-screw extruder, the majority of melt heat comes from shear and compression inside the screw channel, not just the barrel heaters.
If screw geometry is worn or not matched to the resin, or if shear isn’t sufficient, you’ll see unmelt, gels, or inconsistent melt even at high set temperatures.
Q2: Can I retrofit an existing screw extruder to improve melt quality without buying a new machine?
A2: Yes. Upgrading to a properly engineered screw/barrel set, tuned to resin and throughput requirements, possibly with an upgraded non-return valve, can significantly improve melt homogeneity and process stability without needing a full machine replacement.
Q3: How do non-return valves affect melt consistency in injection molding or extrusion?
A3: A good non-return valve ensures clean, consistent forward flow and prevents backflow or leakage that can disturb melt pressure and density. Poor valve design or wear can introduce fluctuations, causing inconsistent shot volumes, surface defects, or unstable viscosity.
Q4: What benefits does real-time melt monitoring (temperature, pressure, viscosity) offer over traditional barrel-thermocouple control?
A4: Real-time melt profiling shows exactly how the polymer behaves inside the barrel — where melting starts, how stable the melt is, whether viscosity remains consistent, and whether wear or material changes are affecting flow.
This enables faster troubleshooting, tighter control, better repeatability, and predictive maintenance before defects appear.
Q5: When should I choose a twin-screw over a single-screw extruder for better melt and mixing performance?
A5: Choose a twin-screw (or a custom-designed screw system) when your process demands intensive mixing, additive/filler dispersion, precise thermal control, or handling of reactive/ shear-sensitive resins, scenarios where a standard single-screw setup struggles.
For simpler resins and stable output requirements, a well-engineered single-screw design often remains the most efficient.