Every reliable part begins with a reliable melt, and that melt is created inside the screw and barrel. These two components determine how resin softens, melts, mixes, and pressurizes, which means they directly influence clarity, color stability, cycle consistency, energy efficiency, and overall part quality.
When the screw and barrel aren’t doing their job, no amount of machine tuning can compensate for it.
This guide gives you a crisp, engineering-focused overview of screw and barrel fundamentals: how each zone actually works, why geometry has such a big impact on melting efficiency, how different designs behave with different resins, and how to spot wear long before it turns into defects or downtime.
If you want a fast, practical reference that strengthens your understanding of the most important components in any plastics machine, you’re in the right place.
Key Takeaways
The screw and barrel create the melt, not the heater bands. Melting is driven mainly by shear, compression, and screw geometry.
Each zone (feed, compression, metering, nozzle) shapes the melt stability. When one zone is off, defects like unmelt, streaks, or short shots appear.
Key geometry flight depth, compression ratio, L/D, and mixers determine melting efficiency, mixing quality, and resin compatibility.
Wear in the screw, barrel, or NRV causes pressure instability, black specks, poor mixing, and inconsistent viscosity long before it’s visible.
Choosing the right screw and barrel and maintaining melt quality improves part consistency, reduces downtime, and prevents recurring defects.
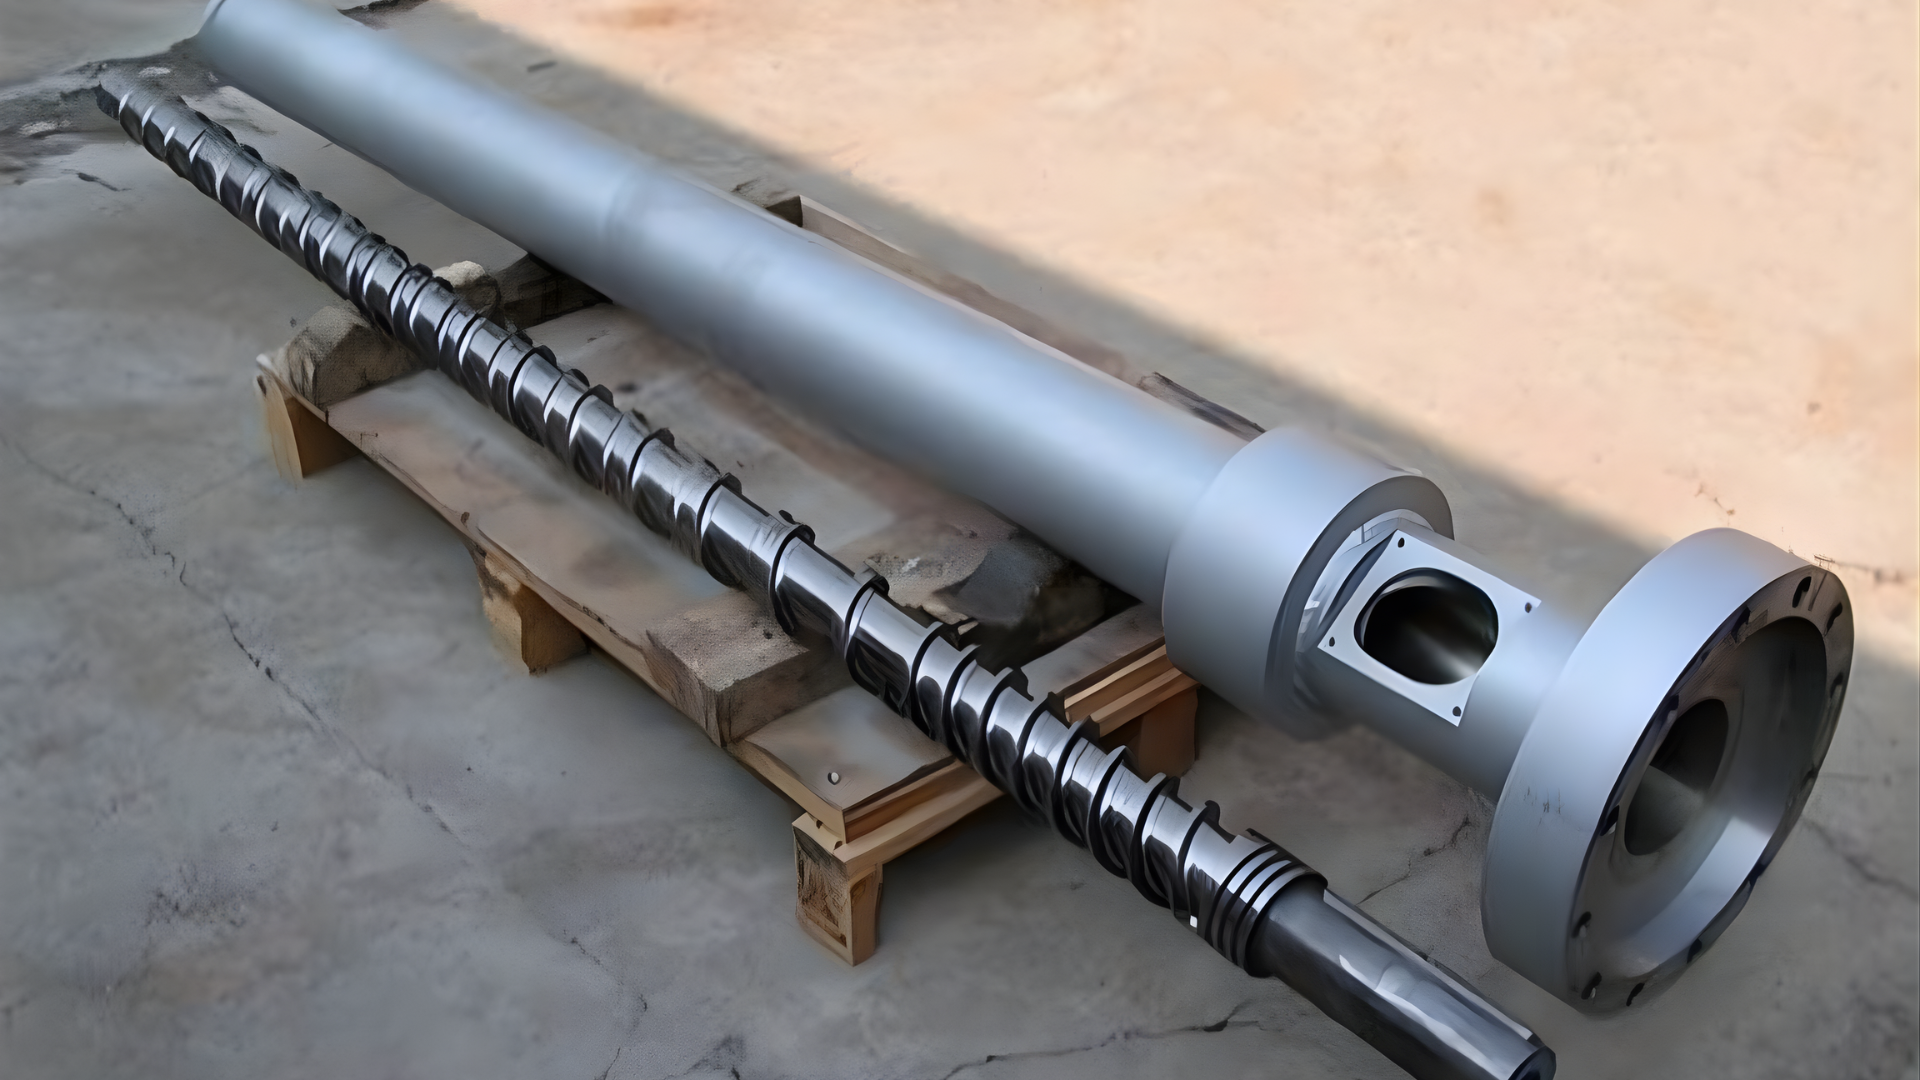
What the Screw & Barrel Do in Plastic Processing
At the simplest level, the screw and barrel work together to melt, mix, pressurize, and deliver polymer melt. Pellets enter the feed zone as solids and leave the front of the barrel as a homogeneous, pressurized melt ready for injection or extrusion.
Everything that happens to the polymer, including its temperature, viscosity, stability, and uniformity, is controlled by these two components.
Melting Is Mechanical + Thermal.
A common misconception is that the barrel heaters melt the plastic. In reality, 80–90% of melting comes from mechanical energy generated by the screw: shear, compression, and friction as pellets collapse into the melt.
Heater bands simply condition the barrel wall; they assist melting, but they do not drive it.
This is why melt temperature often differs from the displayed barrel temperature and why screw design, backpressure, and RPM matter more than heater settings.
Injection vs. Extrusion
Injection molding builds melt consistency for short, high-pressure shots, while extrusion builds continuous, steady-state melt flow, but both rely on the screw and barrel to create a stable melt.
Screw & Barrel Zones Explained
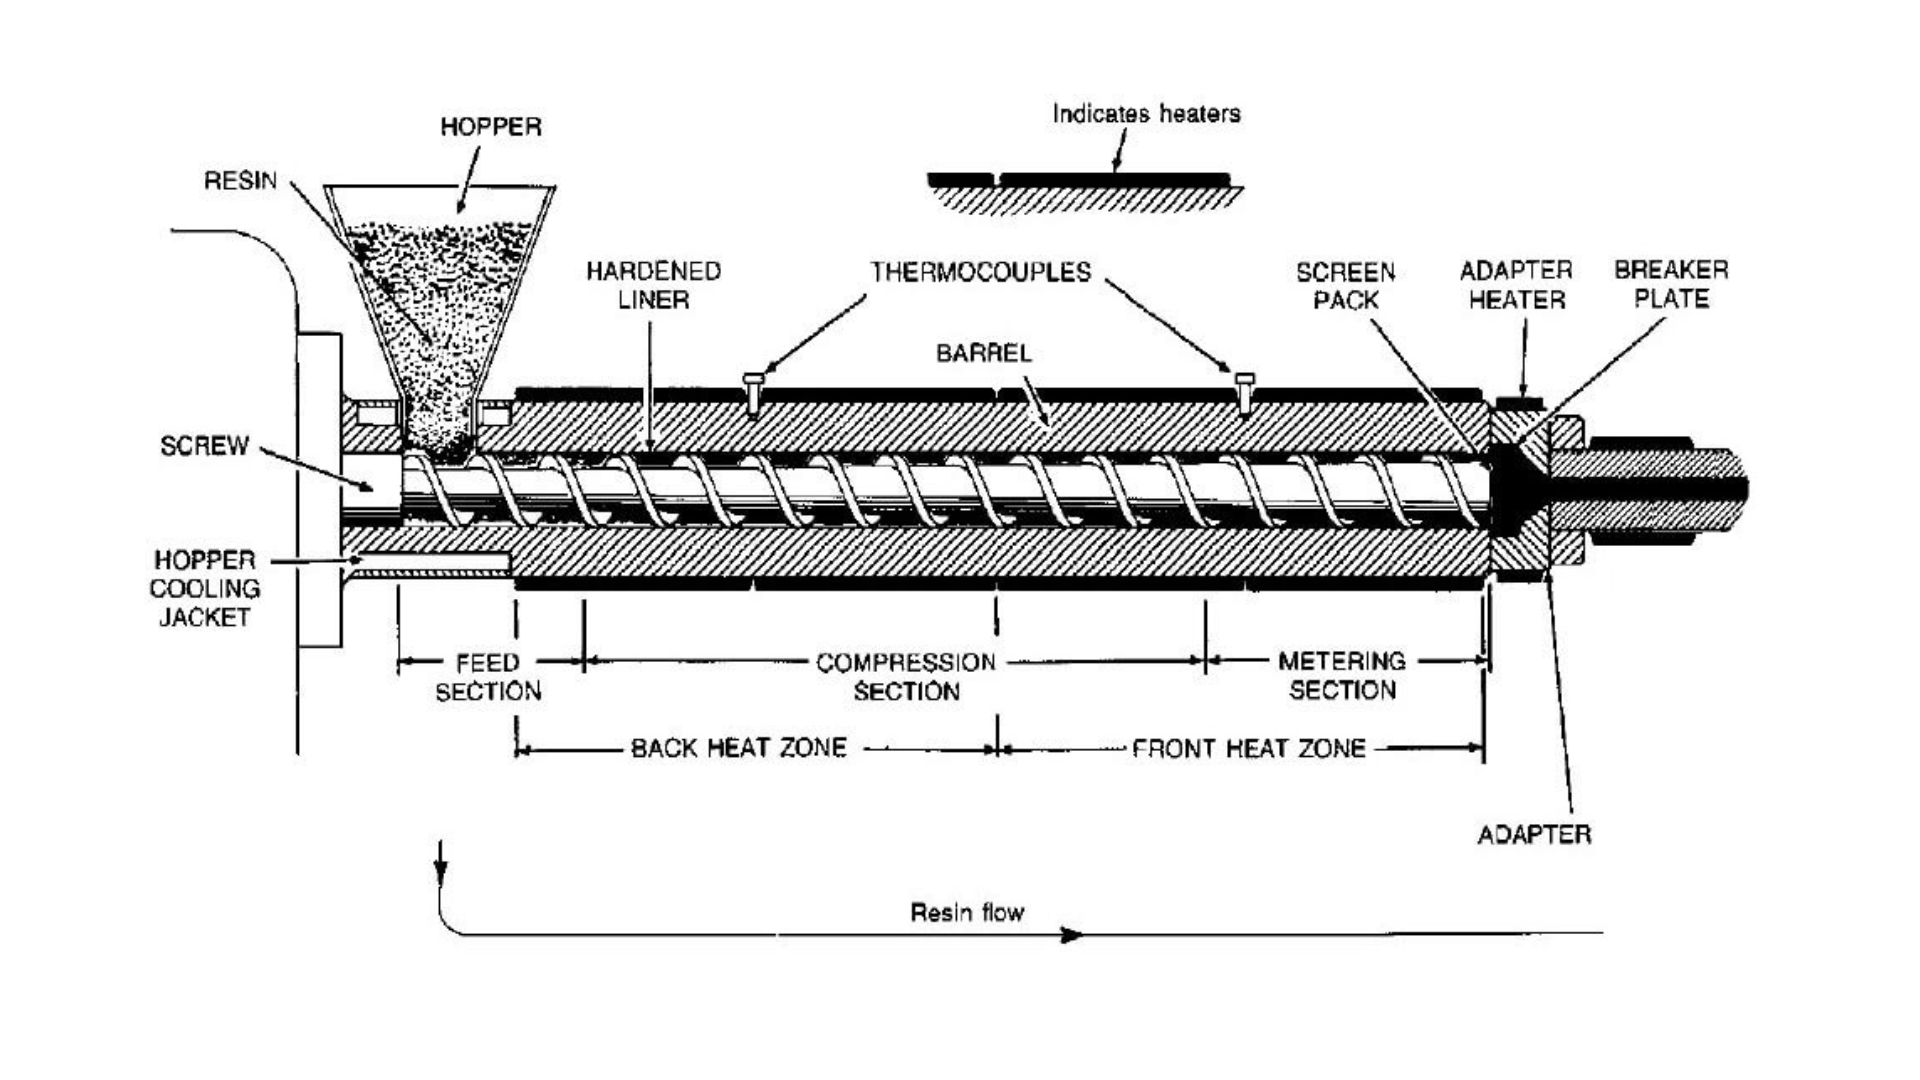
Every screw-and-barrel system is divided into functional zones. Each zone performs a specific part of the melting sequence, and when one zone is off, the melt quality and part quality suffer instantly.
Below is a simple, visual, practical breakdown of what each zone does, why it matters, and what goes wrong when it’s not performing correctly.
1. Feed Zone
What it does:
Pulls pellets in from the hopper
Begins light surface softening
Moves solid resin toward the melting section
Why it matters:
Consistent feeding is the foundation of consistent melt. Too much or too little heat here destabilizes the entire process.
Common problems when wrong:
Too cold: pellet slip, inconsistent screw torque, unmelt entering the next zone
Too hot: pellet sticking/bridging, feed starvation, surging
2. Compression Zone
What it does:
Channel depth decreases → shear increases
Pellets collapse into a melt
Creates the melt pool
Why it matters:
This zone generates most of the actual melting through mechanical shear, not heater bands.
Common problems when wrong:
Too cold/low shear: unmelt flakes, black specs, high injection pressure
Too hot/high shear: degradation, discoloration, brittleness, gas formation
3. Metering Zone: Homogenization & Viscosity Stabilization
What it does:
Finishes melting
Mixes pigment/additives
Produces a uniform, repeatable melt viscosity
Why it matters:
This is the “quality control zone” for the melt. If metering is unstable, the entire downstream process becomes unpredictable.
Common problems when wrong:
Too cold: viscosity spikes, short shots, flow imbalance
Too hot: drool/stringing, overpacking, visible flow lines
4. Nozzle Zone: Flow Delivery & Gate Freeze Control
What it does:
Maintains melt temperature at the point of injection
Ensures proper flow through the tip
Controls drool and cold slug formation
Why it matters:
The nozzle is the last thermal influence before the melt enters the mold; any instability here shows up immediately in the part.
Common problems when wrong:
Too hot: drool, stringing, gate smear, burns
Too cold: cold slugs, hesitation marks, short shots
Once you understand the zones, the next question is how the screw and barrel actually generate this melt behavior, because geometry, not just temperature, is what drives real melting.
Key Screw Geometry Terms You Must Know
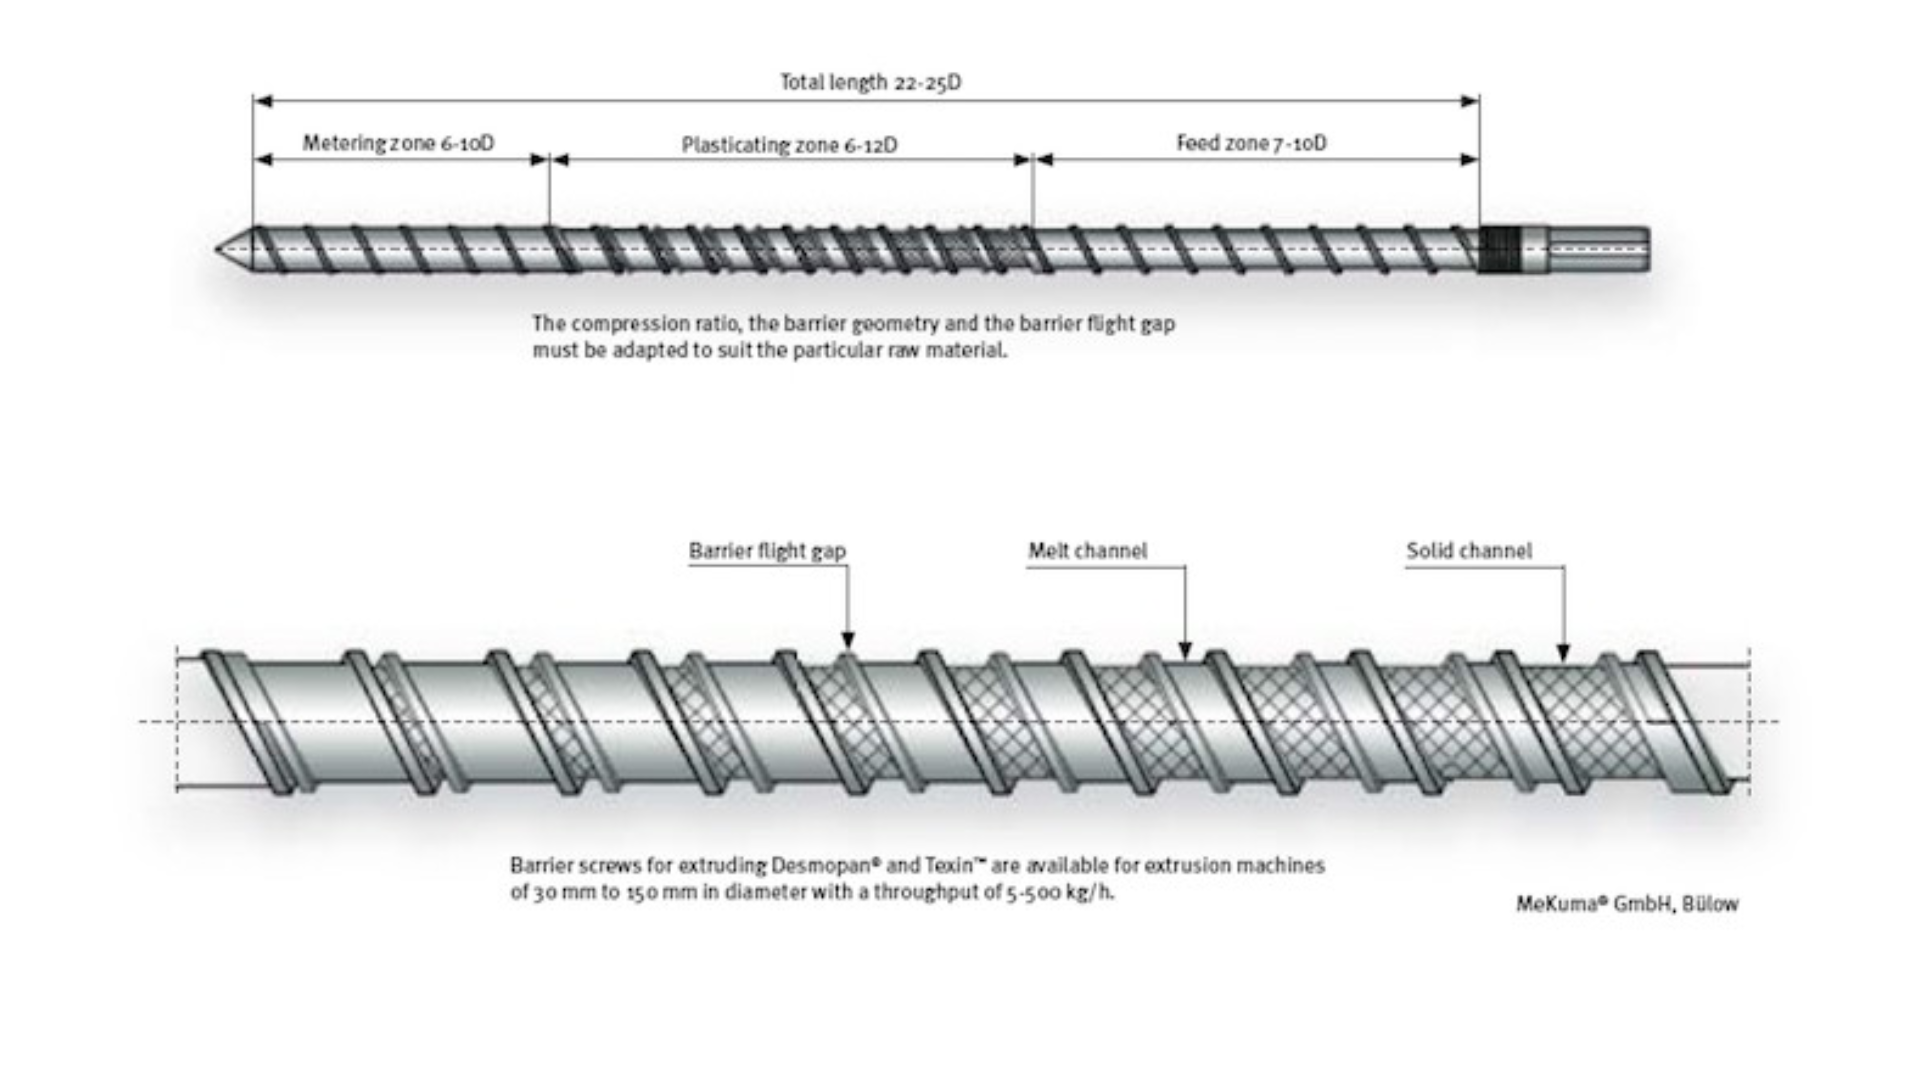
You don’t need to memorize every screw design on the market, just the core geometry terms that determine how a screw melts, mixes, and pressurizes the resin. These fundamentals explain nearly all screw behavior, no matter the machine or material.
Flight Depth & Channel Volume
Flight depth is the distance between the screw root and the outer flight. Together, these depths form the channel volume that carries pellets from feed → compression → metering.
Why it matters:
Deep channels = more throughput, less shear
Shallow channels = more shear, faster melting, higher melt temperature
If melting is inconsistent, flight depth is often the reason.
Compression Ratio
The compression ratio compares the channel depth in the feed zone to the metering zone.
Why it matters:
Low compression (1.5:1–2:1): gentle melting, good for heat-sensitive or shear-sensitive resins
Medium compression (2:1–2.5:1): general-purpose melting
High compression (3:1+): aggressive melting, good for tough crystals or color/mixing challenges
Too much compression → degradation; too little → unmelt.
L/D Ratio (Length-to-Diameter Ratio)
The L/D ratio determines how much residence time and melting length the screw provides.
Why it matters:
Short screws → faster recovery, limited mixing
Longer screws → better melting/mixing, more residence time
L/D is a major factor when processors run recycled content, color concentrates, or tough-to-melt resins.
Basic Mixing Section Types
A screw may include a dedicated mixing section to improve color dispersion or melt uniformity. The most common are:
Maddock Mixer: shear-driven mixing; great for color and temperature uniformity
Spiral Mixer: gentler, promotes distributive mixing without overheating
Barrier Screw: separates solids from the melt to improve melting efficiency and reduce unmelted
Each mixer type balances shear, temperature rise, and homogenization differently.
Common Screw Types & When to Use Them
Different screw designs shape the melt quality in different ways. Here are the core types every processor should recognize, and when each one actually makes sense on the production floor.
General-Purpose Screw (GP Screw)
What it is: A simple 3-zone screw (feed → compression → metering) with moderate compression and no specialized mixing features.
Best for: Most commodity resins, PP, PE, PS, ABS, and SAN, where the process does not require aggressive mixing or tight thermal control.
Why use it: Stable, predictable, forgiving, and it works for 70–80% of standard molding and extrusion jobs.
Barrier Screw
What it is: A screw with a second “barrier” flight that separates solid pellets from molten polymer, improving melting efficiency.
Best for: Crystalline resins (PP, PE, Nylon), high-output extrusion, and applications where unmelted material is a recurring issue.
Why use it:
Faster, more complete melting
Improves throughput
Reduces unmelted and cold slugs
Stabilizes viscosity for multi-cavity molds
Mixing Screw (Maddock, Spiral, or Combination Mixers)
What it is: A screw with dedicated mixing elements that improve melt uniformity.
Best for: Color changes, highly pigmented resins, recycled material, or resins with additives.
Why use it:
Better color dispersion
More uniform melt temperature
Reduces streaking and swirls
Helps processors achieve tighter cosmetic performance
Note: Too much mixing can over-shear shear-sensitive materials like PC, PMMA, and PVC.
Vented or Double-Stage Screws
What they are: Screws with two compression sections and a vent zone in between to release gases, moisture, or volatiles.
Best for: Regrind-heavy processes, moisture-sensitive resins, or extrusion where volatiles must escape.
Why use it:
Removes entrapped air or moisture
Reduces splay and bubbles
Improves stability when running reclaimed material
When to Move to a Twin-Screw System
Single-screw machines handle most molding and extrusion tasks.
But twin-screw becomes necessary when your process demands:
High-intensity mixing
Compounding pigments or additives
Reinforced materials (GF, mineral)
Precise melt homogeneity
Reactive or devolatilizing processing
Rule of thumb: If the resin’s chemistry is being changed or enhanced, not just melted and shaped, twin-screw is the right tool.
Barrel Materials & Wear
The barrel’s metallurgy determines how long a machine maintains melt quality. Different resins attack steel in different ways, so choosing the right material and recognizing wear early prevents unmelted, black specks and inconsistent viscosity.
Nitrided vs. Bimetallic Barrels
Nitrided Barrel
Surface-hardened steel treated for moderate wear resistance
Best for commodity resins (PP, PE, PS, ABS)
Affordable, widely used
Limitations: Poor resistance to glass-filled materials, corrosive additives, and abrasive pigments.
Bimetallic Barrel
Cast iron or tool-steel liner fused inside the barrel bore
High resistance to abrasion, corrosion, and high-temperature wear
Designed for harsh materials
Best for:
Glass-filled nylon
Flame-retardant resins
Titanium dioxide colorants
PVC and halogenated materials
Additive-heavy recycled compounds
If a plant runs anything abrasive or corrosive, bimetallic is no longer optional; it’s the standard.
Abrasion vs. Corrosion Resistance
Abrasion Wear
Caused by:
Glass fibers
Minerals
Metallic pigments
Highly filled resins
Symptoms:
Screw/barrel clearance increases
Unmelt appears in parts
Higher injection pressure required
Inconsistent viscosity
Corrosion Wear
Caused by:
Halogens (PVC, PVDC)
Flame retardants
Chlorine/bromine additives
Moisture reacting at high temperatures
Symptoms:
Pitting inside the barrel
Black specks or gels
Melt discoloration
Accelerated screw wear
Abrasion wears the barrel uniformly. Corrosion destroys it in patches.
Matching Barrel Metallurgy to Resin
Run PP, PE, PS, ABS? → Nitrided or basic bimetal is fine.
Run nylon (PA), PBT, PET, PC, GF resins? → Bimetallic barrel strongly recommended.
Run PVC, halogenated materials, or FR additives? → Corrosion-resistant bimetallic liner is required.
Run recycled resins with unknown filler levels? → Choose high-abrasion bimetal to avoid accelerated wear.
This is one of the highest ROI equipment decisions in processing.
Early Warning Signs of Barrel Wear
You may be losing barrel performance long before it becomes obvious.
Look for:
Increasing backpressure is required to maintain melt quality
Rising melt temperature (compensating for poor shear)
Unmelt specks or grainy melt
Color mixing takes longer
Shot-to-shot variation (due to reduced compression)
Higher torque or recovery time
NRV sealing issues (clearance widened)
If two or more appear at the same time, barrel wear is almost always the culprit.
How to Choose the Right Screw & Barrel (Simple 5-Step Framework)
With dozens of screw designs and barrel metallurgies available, most processors don’t need more options; they need a clear way to choose the right combination.
This 5-step framework cuts through the noise so you can match hardware to resin behavior, melt requirements, and production goals.
1. Start With Your Primary Resin (This drives 70% of the decision)
Every resin group needs a specific melting and shear environment.
If you run mostly:
PP, PE, PS, ABS → General-purpose screw, nitrided or basic bimetal barrel
Nylon, PBT, PET → Barrier screw or higher compression screw + abrasion-resistant bimetal barrel
PC, PMMA → Low-shear screw + stable thermal control
PVC or FR resins → Corrosion-resistant bimetal barrel
Why this matters: Your main resin determines the required melting behavior, shear tolerance, and barrel metallurgy.
2. Consider Your Additives & Fillers (This drives wear & mixing requirements)
Additives dramatically influence hardware selection.
Glass fiber:
→ Needs abrasion-resistant bimetal barrel + controlled shear screw
Mineral-filled resins:
→ Need stronger mixing and stable compression to avoid unmelt
Colorants/masterbatch:
→ Benefit from a screw with mild to moderate mixing features
Recycled content:
→ Requires hardware designed for unknown filler load + venting ability
Why this matters: Fillers don’t just affect the polymer—they directly attack steel and influence melting uniformity.
3. Define the Melt Quality Your Process Needs
This step ensures the hardware supports the product, not just the resin.
If clarity or cosmetics matter:
→ Choose stable, low-dead-spot geometry with gentle temperature rise
If color uniformity matters:
→ Ensure adequate mixing capability
If dimensional repeatability matters:
→ Prioritize consistent compression ratio + robust NRV performance
If throughput matters:
→ Larger channel volume + optimized L/D
Why this matters:
The right hardware amplifies melt stability; the wrong one forces constant tuning.
4. Match the Screw to Your Shot Size or Throughput Window
A screw that is too large or too small creates melt instability.
Too large:
→ Long residence time → degradation, gels, yellowing
Too small:
→ Excessive shear → overheating, viscosity drift
Correct sizing:
→ Recovers within the cycle time without overheating the melt
Why this matters:
Shot size relative to screw volume is one of the biggest hidden sources of melt variability.
5. Match Barrel Metallurgy to Your Wear Environment
Heat, fillers, and corrosive additives determine your barrel’s lifespan.
Commodity resins → nitrided or entry-level bimetal.
Glass-filled or abrasive materials → abrasion-resistant bimetal
PVC, FR resins → corrosion-resistant bimetal
Unknown recycled blends → upgraded bimetal for safety
Why this matters: The barrel sets the baseline for melt consistency.
Once it wears, the screw can no longer control shear or viscosity, no matter the settings.
Troubleshooting: Defects Caused by Screw & Barrel Issues
When the screw or barrel begins to wear, lose compression, or produce uneven melting, the earliest warning signs appear in the part, often long before operators notice a mechanical problem.
This table links the most common defects directly to screw/barrel root causes so you can diagnose problems quickly and accurately.
Defect | Likely Screw / Barrel Issue | What to Check (Fast Diagnosis) |
|---|---|---|
Unmelt/cold slugs | Insufficient shear in the compression zone; excessive screw–barrel clearance; worn flights | Measure melt temp; check screw flight wear; verify compression ratio still effective; inspect NRV sealing. |
Color streaks / poor mixing | Weak mixing section; worn metering zone; too-deep channels; inadequate backpressure | Check mixing section wear; increase backpressure; inspect for dead spots or buildup near NRV. |
Black specks/gels | Barrel pitting (corrosion); stagnant material in worn zones; degradation in dead spots | Inspect front zone & NRV for carbon; evaluate barrel bore for pitting; confirm heaters not creating hot spots. |
Pressure instability / noisy plasticizing | Loss of compression from wear; NRV leakage; inconsistent feeding in Zone 1 | Perform screw recovery pressure trend check; inspect NRV seat & check ring; verify feed-zone temperature/drag |
Short shots (mechanical cause) | NRV backflow; reduced screw output due to wear; inconsistent melt density | Measure check-valve leakage; check backpressure behavior; inspect screw root & flight depth |
Overheating/degradation | Too much shear due to worn screw geometry; compression zone too shallow; thermal imbalance from barrel wear | Verify melt temp vs barrel setpoints; inspect for excessive metal-to-metal wear; review RPM/backpressure interaction. |
Viscosity swings / shot-to-shot variation | Inconsistent melting due to clearance changes, NRV wear, or thermal instability | Run melt-temperature probe; check screw slippage; evaluate heater band cycling and barrel insulation. |
Surging during extrusion | Irregular solids conveying, damaged feed section, screw not pulling pellets consistently | Inspect feed-zone flight wear; check hopper throat cooling; evaluate resin dryness and pellet size consistency |
Why These Symptoms Show Up Before Hardware Failure
Screw and barrel wear doesn’t start with dramatic breakdowns; it begins with:
Loss of compression → unstable melting
Increased clearance → reduced shear
Dead spots → stagnation and degradation
NRV leakage → inconsistent shot volume
Thermal imbalance → viscosity drift
Because melt responds immediately to these mechanical changes, the part becomes your first diagnostic tool.
How MD Plastics Improves Screw & Barrel Performance
MD Plastics strengthens the fundamentals of screw-and-barrel performance by improving how the melt is actually created and conditioned inside the plasticating unit:
Engineered screw geometries eliminate dead spots, improve melting efficiency, and enhance mixing, fixing many issues that operators mistakenly try to solve with temperature changes.
Precision non-return valves (NRVs) maintain consistent melt density and prevent backflow, which stabilizes pressure, shot size, and color transitions.
Optimized barrels and nozzles provide better thermal uniformity, reducing degradation, black specks, and viscosity drift.
Real-time melt monitoring tools (Melt-Profiler™, Melt-IQ®, TempSense™) reveal the actual melt conditions: temperature, pressure, and viscosity, so processors can tune the screw and barrel based on data rather than guesswork.
Together, these upgrades ensure the screw and barrel consistently do what they’re designed to do: produce a stable, homogeneous melt that drives predictable, high-quality production.
If you want screw and barrel systems that melt efficiently, mix consistently, and deliver predictable shot quality, MD Plastics can help.
Our team takes an analytical, engineering-driven approach, studying your process, your equipment, and your melt behavior to design the right plasticating solutions for your operation.
If you’re ready to strengthen the core of your plasticating process, talk to an MD Plastics engineer about building the right screw and barrel solution for your application.
Conclusion
A well-understood screw and barrel system is the foundation of stable melt quality. When you understand how each zone works, how geometry influences shear and mixing, and how wear affects performance, you gain direct control over:
More stable melt temperature and viscosity
Higher and more repeatable part quality
Faster, more accurate troubleshooting
Reduced wear, fewer defects, and longer component life
Strong melt preparation doesn’t happen by accident—it happens when the screw and barrel are designed, maintained, and operated with intention.
See the Difference a Properly Engineered Screw Makes
MD Plastics applies an engineering-first methodology to screw and barrel performance, studying your machine conditions, processing requirements, and melt flow behavior to design components that enhance melting efficiency, remove stagnation zones, and deliver more consistent, repeatable melt quality.
Want proof?
See real-world before-and-after melt improvements with MD Plastics’ Posi-Melt® Screw:
FAQs
1. What is the basic function of the screw and barrel?
They work together to melt, mix, compress, and deliver the polymer melt. The screw provides mechanical energy and shear; the barrel provides controlled heat and containment.
2. What is a compression ratio?
It’s the ratio between the channel depth in the feed zone and the metering zone.
Higher ratios = more shear and faster melting.
Lower ratios = gentler melting for shear-sensitive materials.
3. How do I know if my screw or barrel is worn?
Common signs include:
Increasing backpressure
Rising melt temperature
Unmelt or black specks
Slower recovery time
Shot-size or pressure inconsistency
Two or more symptoms usually indicate measurable wear.
4. Which screw type is best for mixing or color?
A mixing screw (Maddock, spiral, or combination mixer) delivers the best color dispersion and melt uniformity.
For aggressive color loads or recycled material, a barrier + mixer combo may perform best.
5. Can one screw run every material?
No.
A general-purpose screw can run many resins, but not ideally. Materials differ in shear sensitivity, melting behavior, and additive load. Matching screw geometry to resin provides better melt quality, faster cycles, and reduced wear.